Trigger types
Manual Trigger by Builder
Run manually from the builder.
API Trigger
Start via an HTTP endpoint.
Schedule Trigger
Run on a schedule.
Email Trigger
Start when an email is received.
Integration App Trigger
Start from an external app event (Slack, Gmail, GitHub, etc.).
Interface
Start from a user-facing form. See Interface.
Manual Trigger
The simplest trigger — always present on every workflow and cannot be deleted. Fires when you click Run Workflow in the editor header or when you call the workflow programmatically without a specific trigger. Useful for authoring and testing.API Trigger
Exposes the workflow as an HTTP endpoint. Each API trigger has two URLs:- Draft URL — hits the current draft of the workflow. Useful while iterating.
- Live URL — hits the most recent release of the workflow.
- Authentication — an auth header Pinkfish auto-provisions for the trigger.
- Input schema — declare the expected request body shape so the coding agent (and downstream nodes) know what fields to expect.
curl command with your auth token and a pretty-printed JSON body editor.
For programmatic invocation details, see Triggers API.
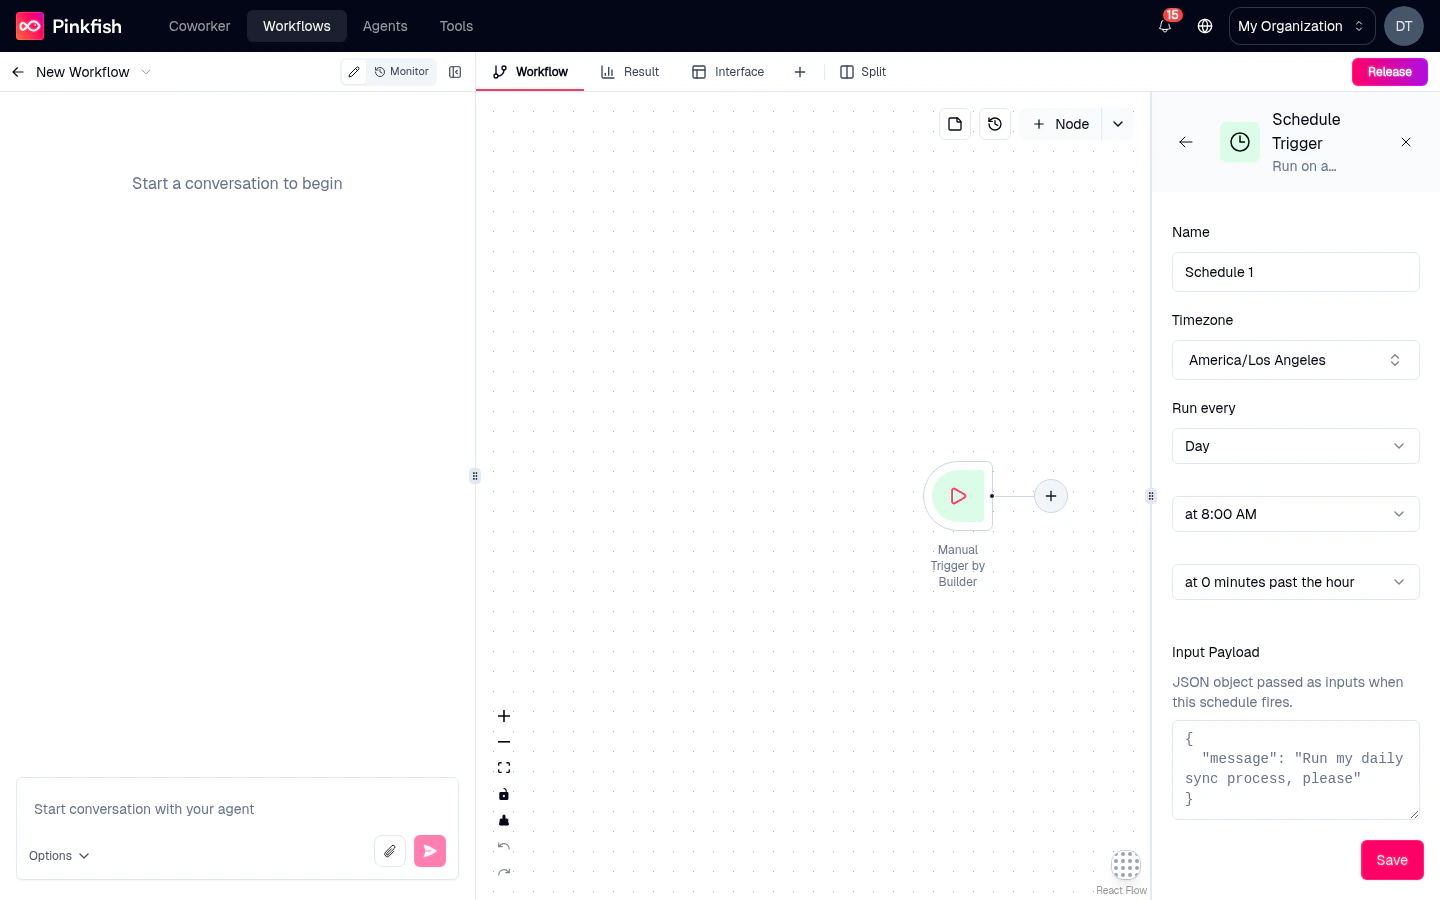
Schedule Trigger
Runs the workflow on a cron schedule. Configure with:- Cron expression — an AWS EventBridge 6-field cron (
minute hour day-of-month month day-of-week year). Exactly one of day-of-month / day-of-week must be?— e.g.0 9 * * ? *(9 AM daily) or0 0 ? * 2 *(Mondays at midnight). Expressions that AWS would reject (such as0 * * * * *, with*in both day fields) are refused when you save. - Timezone — the timezone the cron runs in.
- A next-run preview that shows when the trigger will fire next, in a human-readable form (“Tomorrow at 08:00 UTC”).
Email Trigger
Gives the workflow an inbound email address —trigger-<id>@pinkfish.email — and fires whenever a message arrives at that address. The email body, subject, sender, and attachments are exposed as inputs to downstream nodes.
Integration App Trigger
Start the workflow from an event inside a connected app. Pick the app (Slack, Gmail, GitHub, HubSpot, Linear, Notion, and many more), then pick the event (New Email, New Slack Message, Issue Created, etc.). Pinkfish subscribes to the app’s webhook or polls its API and fires your workflow when the event occurs.
Authentication flows through your existing connections. If the app isn’t connected yet, the trigger editor walks you through adding the connection inline.
Event Trigger
For internal Pinkfish events — another workflow completing, a data collection updating, a specific agent finishing a run. See Event triggers for the full reference.Trigger input schema
Every trigger can declare an input schema — a JSON-schema-like definition of the data shape the workflow expects to receive. Inputs appear as named fields the coding agent and downstream nodes can reference ({{trigger.customerName}}), and they’re validated before the workflow runs.
Click Edit input schema on any trigger settings panel to open the schema editor. Fields support types: string, number, boolean, object, array, file, enum, date, and more.
Draft vs live triggers
Agentic workflows maintain separate draft and live versions of each trigger. Iterating on the draft doesn’t affect production callers; when you release the workflow, the live trigger URL starts pointing at the new version. You’ll see a small Draft or Live badge in the trigger settings panel indicating which version’s configuration you’re editing.Testing a trigger
- Manual — click Run Workflow in the header.
- API — open Call API trigger and send the generated curl.
- Schedule — click Run now (fires as if the scheduled time had arrived).
- Email — send a real email to the trigger’s address.
- App trigger — perform the event in the source app (post a message, open an issue).
Adding a trigger
Open the Add Node panel, switch to the Triggers tab, and pick a trigger type. The trigger node appears on the canvas at the left edge and its settings panel opens automatically so you can configure it immediately.What’s next
Running a workflow
Test your trigger with real or simulated invocations.
Interface
Configure the user-facing form that the Interface trigger serves.
Event triggers
Pinkfish’s internal event system.
API reference
Program against trigger endpoints from outside Pinkfish.