> ## Documentation Index
> Fetch the complete documentation index at: https://docs.pinkfish.ai/llms.txt
> Use this file to discover all available pages before exploring further.
# Connections
> Manage third-party app integrations and build your own custom integrations
**Connections** is where you link Pinkfish to every third-party app your agents and workflows need — Salesforce, Slack, Google Sheets, HubSpot, Jira, and hundreds more. It's also where you build your own custom integration when the app you need isn't in the catalog.
Find it under **Tools → Connections**.
 ## The Connections List
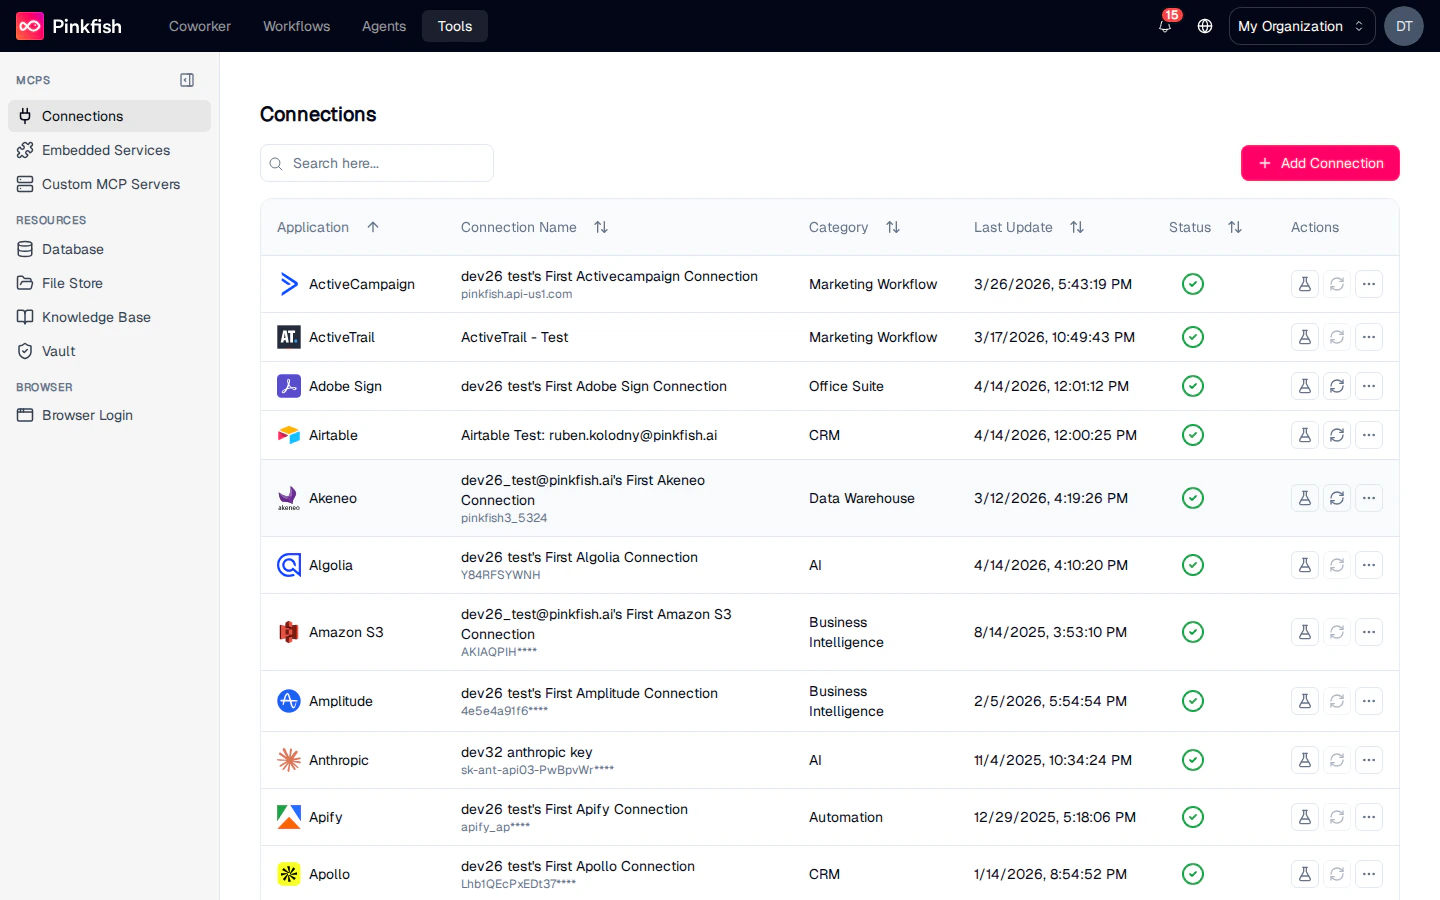
Each row represents one established connection — an app plus the credentials that let Pinkfish talk to it. Columns:
| Column | Description |
| ------------------- | ----------------------------------------------------------------------------------------------------------- |
| **Application** | App logo and name (e.g. "Salesforce", "Slack"). |
| **Connection Name** | Your label for this connection, plus a dim identifier underneath (account identifier, workspace URL, etc.). |
| **Category** | Functional grouping — CRM, Marketing Workflow, Business Intelligence, Developer Tools, and so on. |
| **Last Update** | When the connection was last modified. |
| **Status** | Green check for healthy, amber/red when the session needs attention. |
| **Actions** | Test MCP tools, Reconnect, and a More menu with Edit / Share / Delete. |
Shared connections show a small icon next to the name with the tooltip "Shared".
### Row actions
## The Connections List
Each row represents one established connection — an app plus the credentials that let Pinkfish talk to it. Columns:
| Column | Description |
| ------------------- | ----------------------------------------------------------------------------------------------------------- |
| **Application** | App logo and name (e.g. "Salesforce", "Slack"). |
| **Connection Name** | Your label for this connection, plus a dim identifier underneath (account identifier, workspace URL, etc.). |
| **Category** | Functional grouping — CRM, Marketing Workflow, Business Intelligence, Developer Tools, and so on. |
| **Last Update** | When the connection was last modified. |
| **Status** | Green check for healthy, amber/red when the session needs attention. |
| **Actions** | Test MCP tools, Reconnect, and a More menu with Edit / Share / Delete. |
Shared connections show a small icon next to the name with the tooltip "Shared".
### Row actions
 | Icon | Action | Notes |
| -------- | ------------------------- | ---------------------------------------------------------------------------------------------------------------------------------------------------------------- |
| Flask | **Test MCP tools** | Opens a dialog to exercise the app's tools against this connection. Greyed out with the tooltip "MCP tools coming soon" when the app doesn't have MCP tools yet. |
| Refresh | **Reconnect** | Only enabled for OAuth 2.0 apps. Re-runs the authorization flow to refresh an expired session. |
| More (⋯) | **Edit / Share / Delete** | Edit is always available; Share requires admin permission; Delete requires write permission. |
Delete opens a confirmation dialog titled "Delete Connection" with the text "Are you sure you want to delete the connection?" — click **Confirm** to remove it. On success a toast reads "Connection deleted successfully."
## Adding a Connection
Click **Add Connection** in the top right. The integration picker opens.
| Icon | Action | Notes |
| -------- | ------------------------- | ---------------------------------------------------------------------------------------------------------------------------------------------------------------- |
| Flask | **Test MCP tools** | Opens a dialog to exercise the app's tools against this connection. Greyed out with the tooltip "MCP tools coming soon" when the app doesn't have MCP tools yet. |
| Refresh | **Reconnect** | Only enabled for OAuth 2.0 apps. Re-runs the authorization flow to refresh an expired session. |
| More (⋯) | **Edit / Share / Delete** | Edit is always available; Share requires admin permission; Delete requires write permission. |
Delete opens a confirmation dialog titled "Delete Connection" with the text "Are you sure you want to delete the connection?" — click **Confirm** to remove it. On success a toast reads "Connection deleted successfully."
## Adding a Connection
Click **Add Connection** in the top right. The integration picker opens.
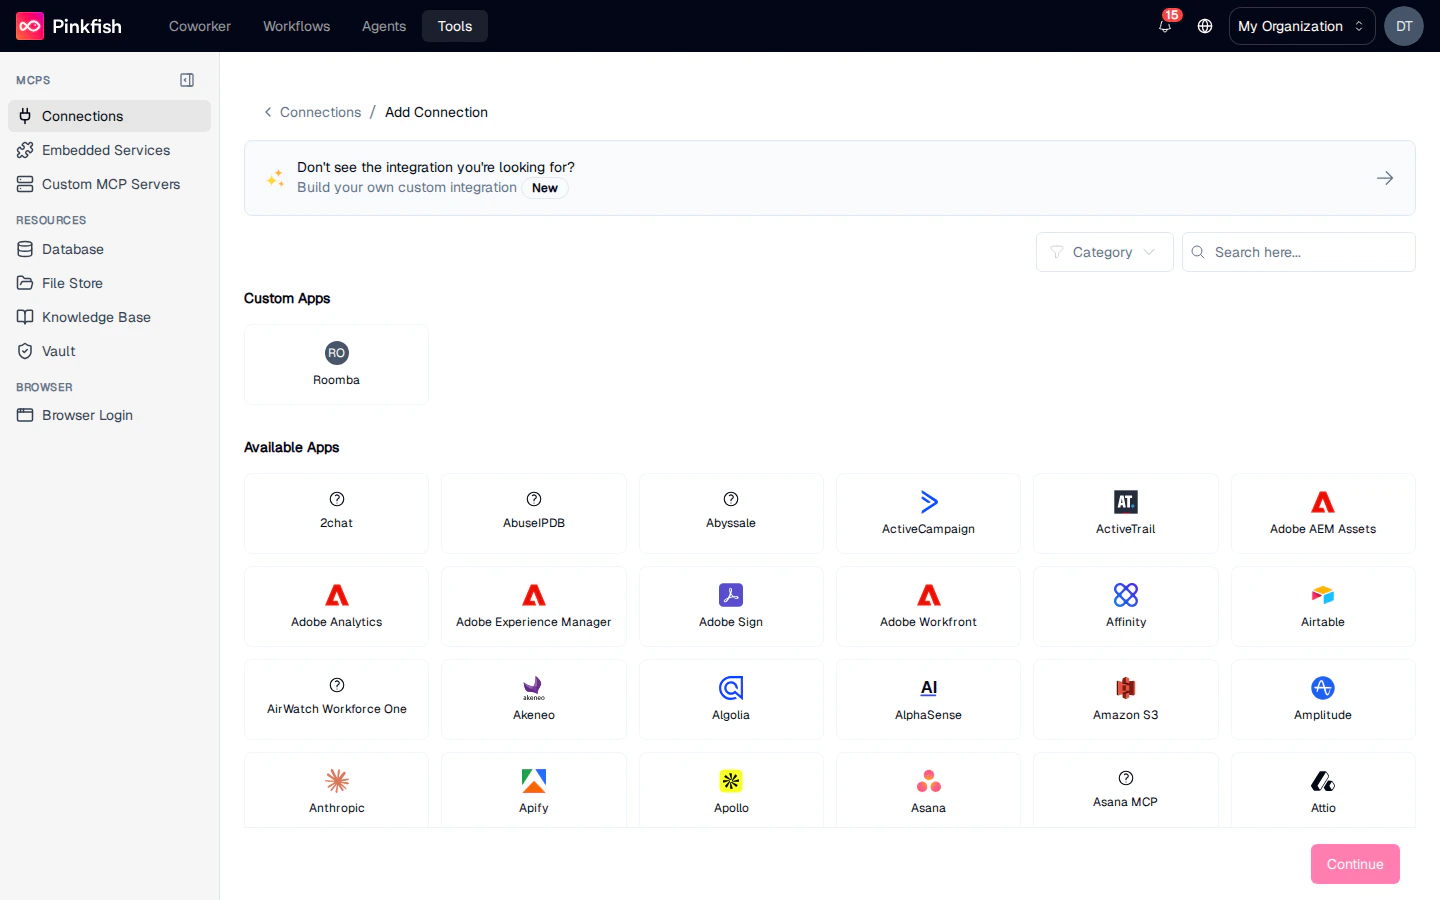 The picker has three sections:
1. **"Don't see the integration you're looking for?"** — a banner linking to the custom integration builder.
2. **Custom Apps** — apps your org has already built and registered (if any).
3. **Available Apps** — the full catalog of pre-built Pinkfish integrations.
Use the **Category** filter and search box to narrow the list. Click any card to select, then follow the app's auth flow (usually OAuth in a popup window). Once complete, the new connection appears on the Connections list.
## Restricting Which Tools a Connection Can Use
The connection form has a **Tool Access (optional)** section with two choices:
* **Allow all tools (default)** — any tool the app exposes may be used through this connection.
* **Restrict to specific tools** — pick up to 50 tools; every other tool call through this connection is refused.
This is enforced server-side, so it holds no matter which agent or workflow uses the connection. It pairs well with a shared connection: if you org-share a Salesforce connection so teammates can run one agent, restricting it to the handful of tools that agent needs limits what any *other* agent could do with the same credentials. See [Tool Sharing and Identity](/tools/sharing-and-identity).
The restriction matches whole tool names. A general-purpose tool that takes an arbitrary URL or query is either allowed or not — the list cannot constrain what that tool is asked to do.
## Testing a Connection's Tools
For any connection with MCP tools available, clicking the flask icon opens the **{App} Tools** dialog. The left side lists every MCP server and tool the app exposes; the right side shows a parameter form and a **Select a Tool** placeholder until you pick one.
The picker has three sections:
1. **"Don't see the integration you're looking for?"** — a banner linking to the custom integration builder.
2. **Custom Apps** — apps your org has already built and registered (if any).
3. **Available Apps** — the full catalog of pre-built Pinkfish integrations.
Use the **Category** filter and search box to narrow the list. Click any card to select, then follow the app's auth flow (usually OAuth in a popup window). Once complete, the new connection appears on the Connections list.
## Restricting Which Tools a Connection Can Use
The connection form has a **Tool Access (optional)** section with two choices:
* **Allow all tools (default)** — any tool the app exposes may be used through this connection.
* **Restrict to specific tools** — pick up to 50 tools; every other tool call through this connection is refused.
This is enforced server-side, so it holds no matter which agent or workflow uses the connection. It pairs well with a shared connection: if you org-share a Salesforce connection so teammates can run one agent, restricting it to the handful of tools that agent needs limits what any *other* agent could do with the same credentials. See [Tool Sharing and Identity](/tools/sharing-and-identity).
The restriction matches whole tool names. A general-purpose tool that takes an arbitrary URL or query is either allowed or not — the list cannot constrain what that tool is asked to do.
## Testing a Connection's Tools
For any connection with MCP tools available, clicking the flask icon opens the **{App} Tools** dialog. The left side lists every MCP server and tool the app exposes; the right side shows a parameter form and a **Select a Tool** placeholder until you pick one.
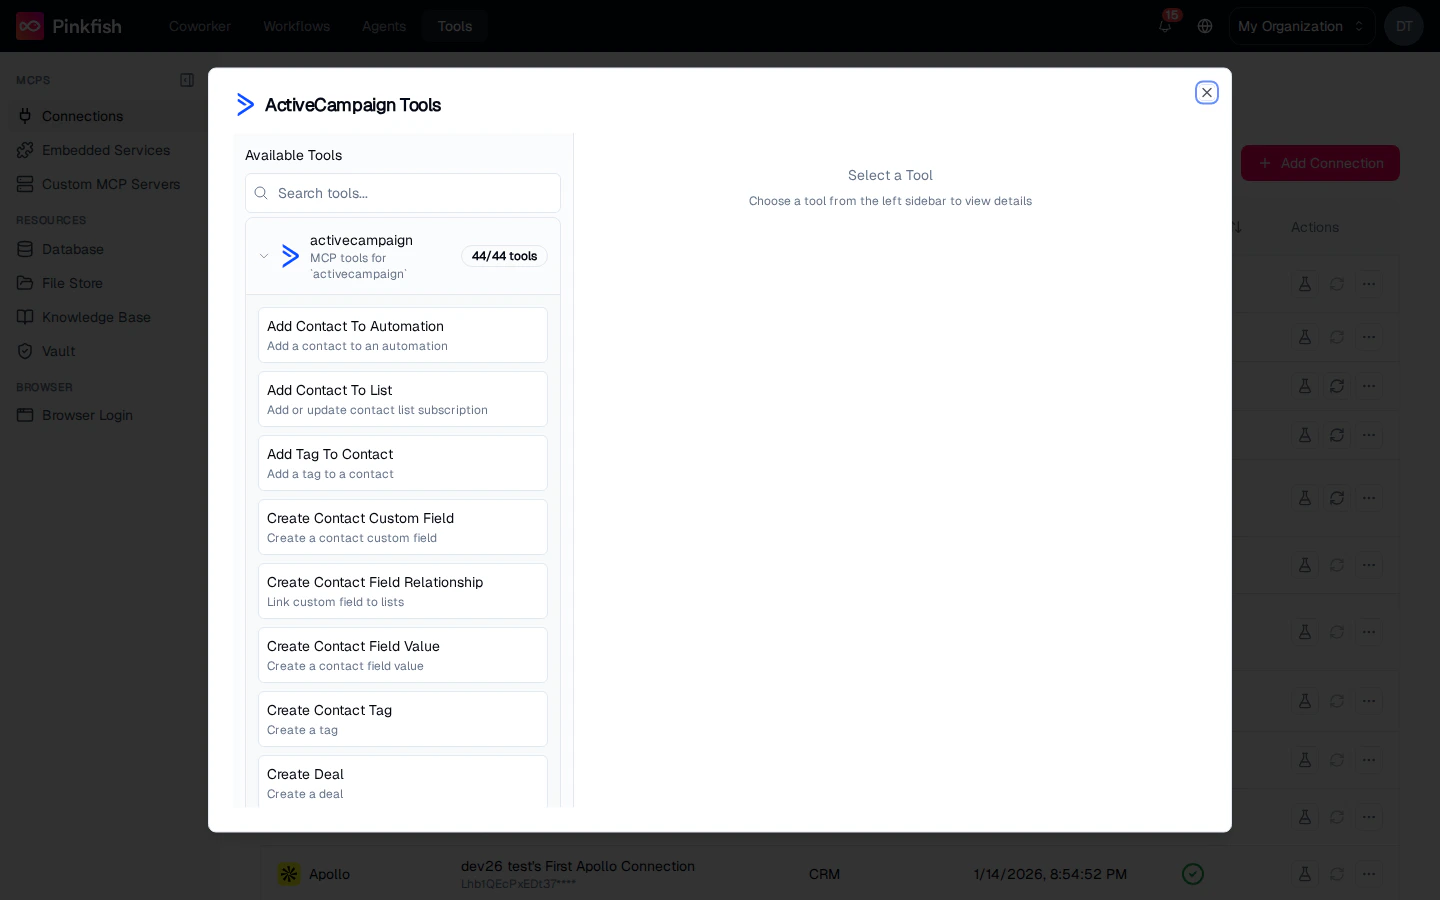 Typical flow:
1. Expand a server (e.g. `activecampaign` with 44/44 tools) to see its tools.
2. Select a tool.
3. Fill in the parameters in the form on the right.
4. Click the run button to execute; the response panel shows the live output.
This is the fastest way to verify a connection is healthy and to learn what a tool expects before referencing it in an agent or workflow.
## Building a Custom Integration
When the app you need isn't in the catalog — or you want to wrap your own internal API — click **Build your own custom integration** from the Add Connection banner. Pinkfish walks you through a three-step wizard: **Basic Info & Auth Type → Auth Configuration → MCP Server Setup**.
Typical flow:
1. Expand a server (e.g. `activecampaign` with 44/44 tools) to see its tools.
2. Select a tool.
3. Fill in the parameters in the form on the right.
4. Click the run button to execute; the response panel shows the live output.
This is the fastest way to verify a connection is healthy and to learn what a tool expects before referencing it in an agent or workflow.
## Building a Custom Integration
When the app you need isn't in the catalog — or you want to wrap your own internal API — click **Build your own custom integration** from the Add Connection banner. Pinkfish walks you through a three-step wizard: **Basic Info & Auth Type → Auth Configuration → MCP Server Setup**.
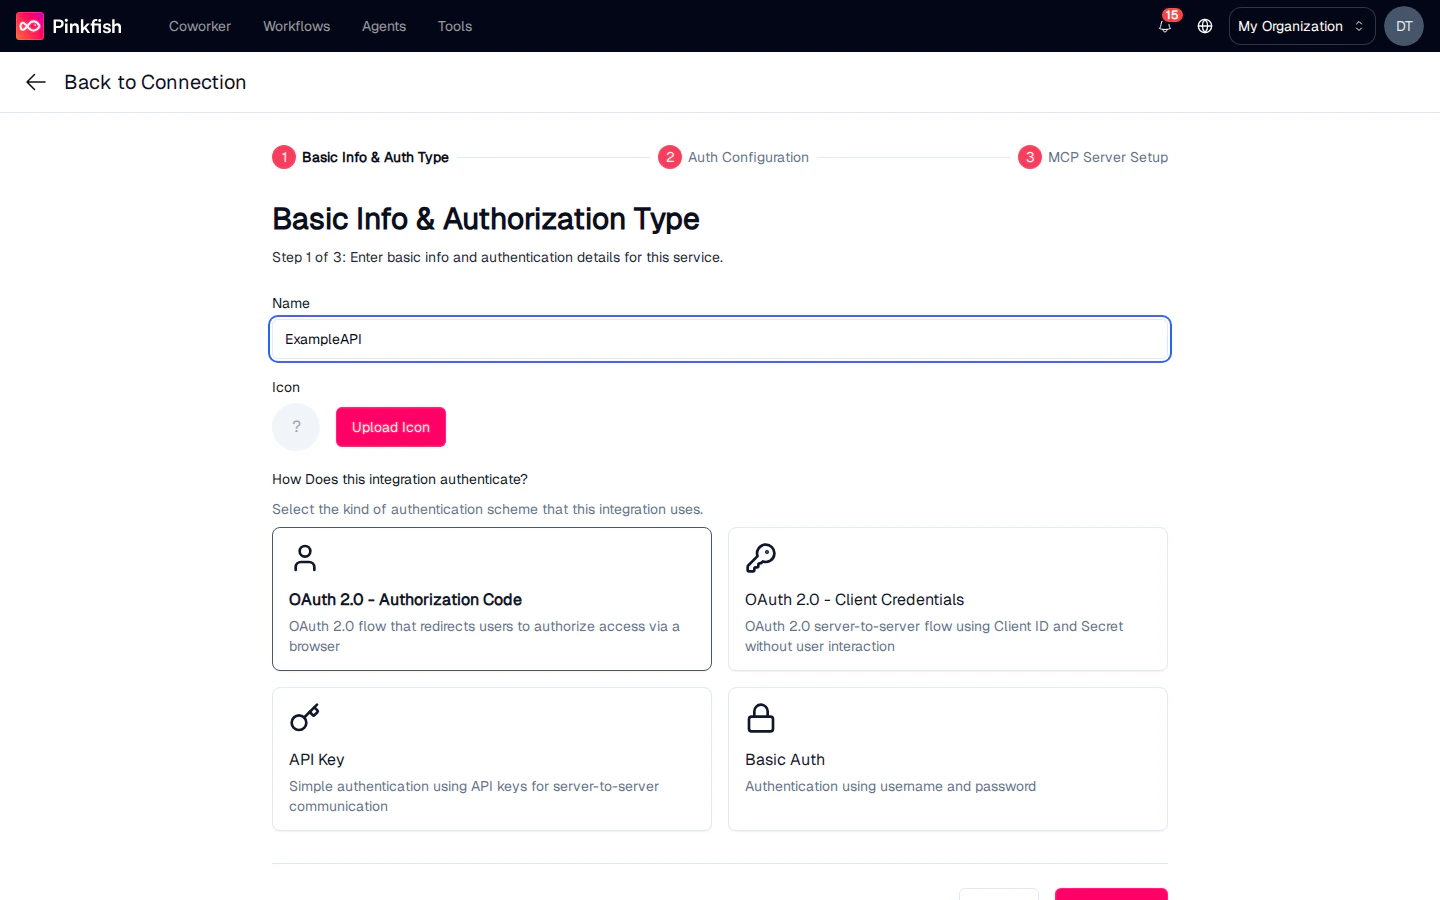 ### Step 1: Basic Info and Auth Type
Fill in a name and (optionally) upload an icon. Then pick one of four authorization types:
User-facing OAuth flow that redirects each user to authorize access in a browser. Use for apps that let *end users* bring their own accounts (Google Workspace, Microsoft 365, GitHub, etc.).
Server-to-server OAuth 2.0 flow using a Client ID and Client Secret, no user interaction. Use for machine-to-machine access to a single service account.
Single API key (in a header or query string) for every call. The simplest setup for services that issue a long-lived secret.
Username + password authentication. Pinkfish encodes the pair into the `Authorization: Basic …` header on every request.
### Step 2: Auth Configuration
The second step is tailored to the auth type you picked. Every variant asks for an **API Base URL** and a **Test Endpoint URL Path** so Pinkfish can validate the credentials against a real call.
#### API Key
### Step 1: Basic Info and Auth Type
Fill in a name and (optionally) upload an icon. Then pick one of four authorization types:
User-facing OAuth flow that redirects each user to authorize access in a browser. Use for apps that let *end users* bring their own accounts (Google Workspace, Microsoft 365, GitHub, etc.).
Server-to-server OAuth 2.0 flow using a Client ID and Client Secret, no user interaction. Use for machine-to-machine access to a single service account.
Single API key (in a header or query string) for every call. The simplest setup for services that issue a long-lived secret.
Username + password authentication. Pinkfish encodes the pair into the `Authorization: Basic …` header on every request.
### Step 2: Auth Configuration
The second step is tailored to the auth type you picked. Every variant asks for an **API Base URL** and a **Test Endpoint URL Path** so Pinkfish can validate the credentials against a real call.
#### API Key
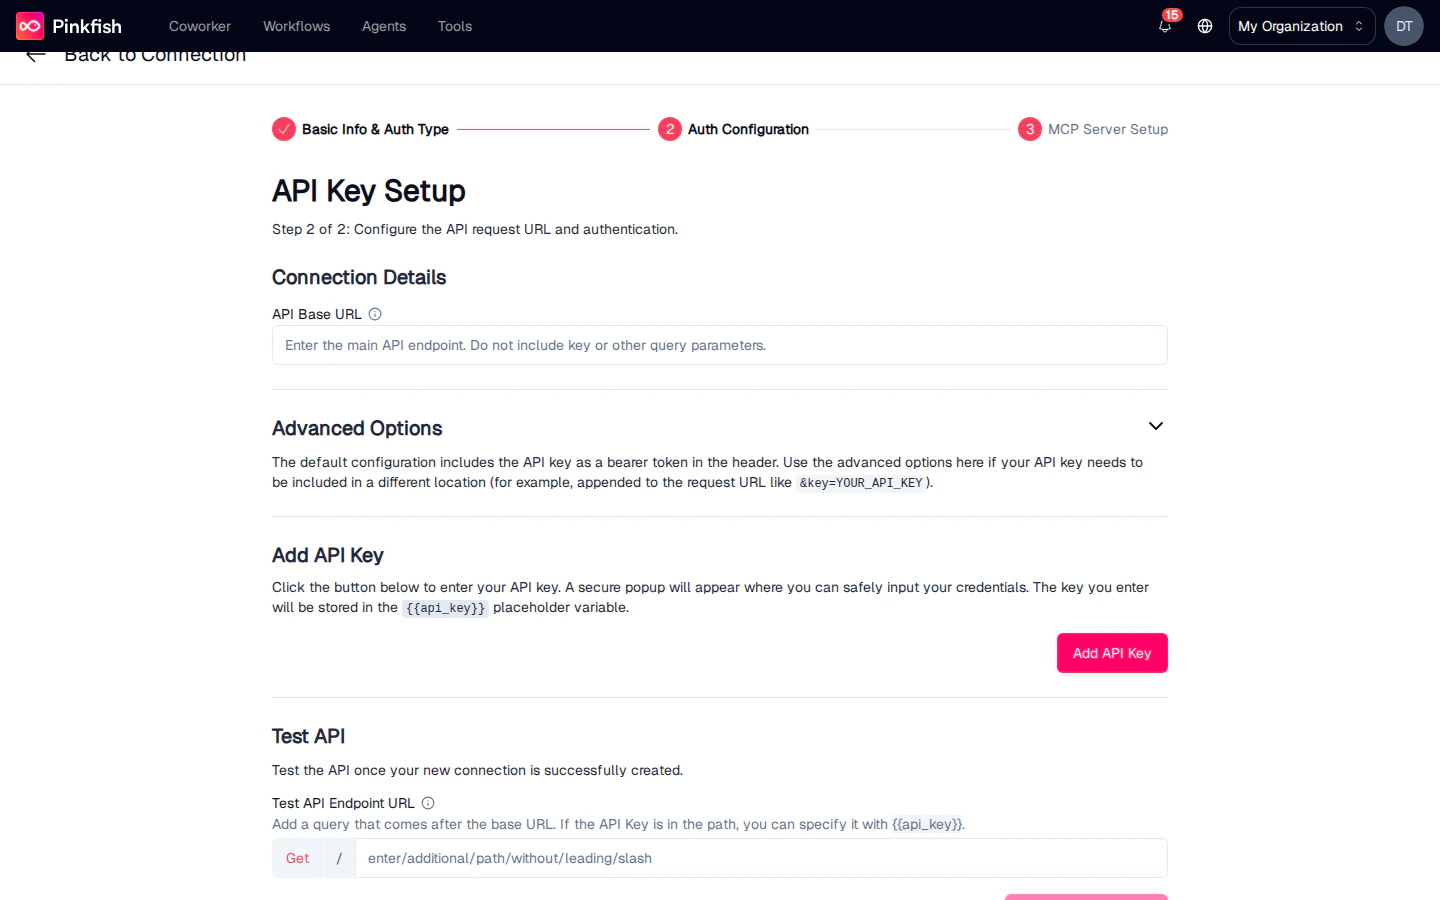 * **API Base URL** — the root of the service (e.g. `https://api.example.com`).
* **Advanced Options** — how the key is attached. By default Pinkfish includes the key as a header `x-api-key: {{API_KEY}}`, but you can switch to a query-string parameter or set a custom header name.
* **Add API Key** — paste the key into the secure field. Keys never appear in plain text after saving.
* **Test API** — run a request against the test endpoint to confirm everything is wired up before saving.
#### Basic Auth
* **API Base URL** — the root of the service (e.g. `https://api.example.com`).
* **Advanced Options** — how the key is attached. By default Pinkfish includes the key as a header `x-api-key: {{API_KEY}}`, but you can switch to a query-string parameter or set a custom header name.
* **Add API Key** — paste the key into the secure field. Keys never appear in plain text after saving.
* **Test API** — run a request against the test endpoint to confirm everything is wired up before saving.
#### Basic Auth
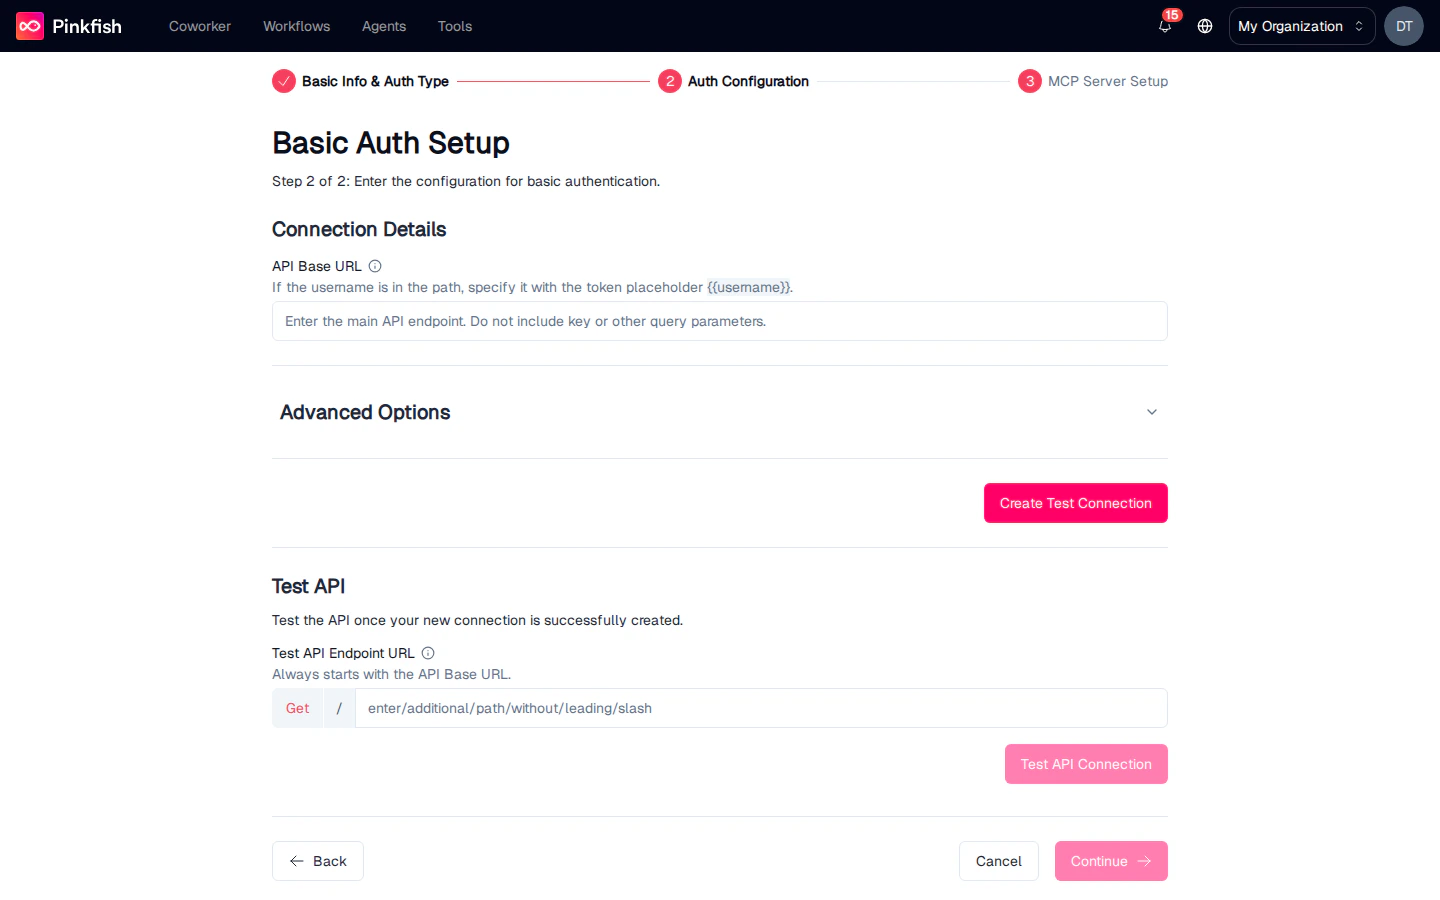 * **API Base URL** — the root URL.
* Username and password are collected when the user creates a connection from this integration, not when the integration itself is defined. The configuration step just says where to send them.
* **Advanced Options** expose placeholders like `{{USERNAME}}` and `{{PASSWORD}}` so you can embed the values into custom headers or query parameters when needed.
* **Test API** — validate against the test endpoint.
#### OAuth 2.0 — Authorization Code
* **API Base URL** — the root URL.
* Username and password are collected when the user creates a connection from this integration, not when the integration itself is defined. The configuration step just says where to send them.
* **Advanced Options** expose placeholders like `{{USERNAME}}` and `{{PASSWORD}}` so you can embed the values into custom headers or query parameters when needed.
* **Test API** — validate against the test endpoint.
#### OAuth 2.0 — Authorization Code
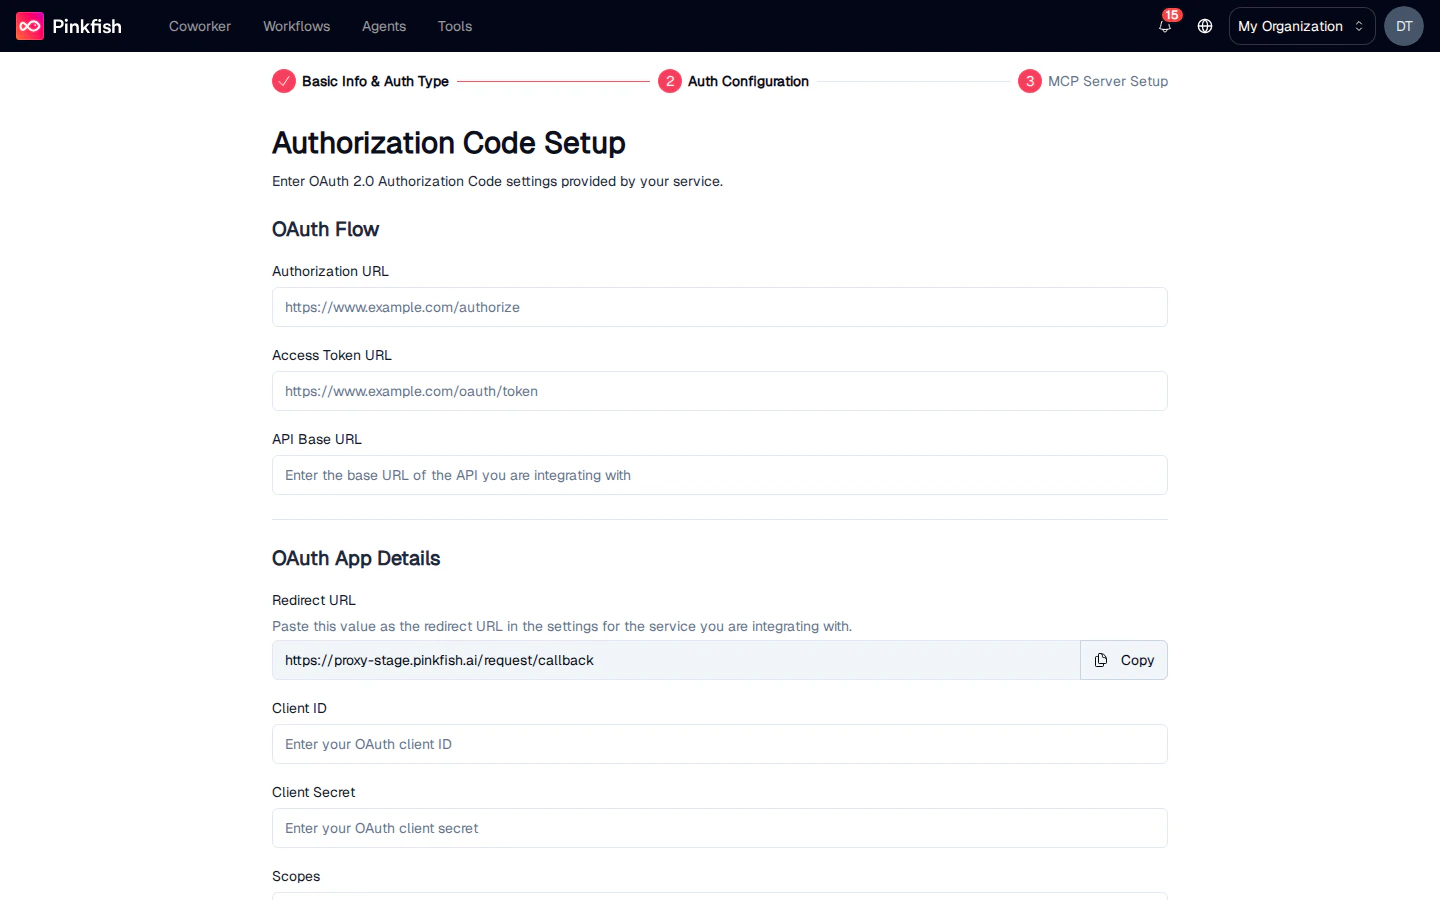 Fields to fill in:
* **Authorization URL** — where Pinkfish sends users to log in (e.g. `https://auth.example.com/oauth/authorize`).
* **Access Token URL** — the endpoint that exchanges the code for a token.
* **API Base URL** — the root of the service being integrated.
* **Redirect URL** — Pinkfish provides this value on the page. Copy it and register it with the upstream provider as an allowed redirect URI.
* **Client ID** and **Client Secret** — issued by the upstream provider when you register a new OAuth app.
* **Scopes** — space-separated list of permission scopes to request.
Advanced toggles include **Use PKCE**, **Send client credentials in request body**, and custom authorization/token params.
#### OAuth 2.0 — Client Credentials
Fields to fill in:
* **Authorization URL** — where Pinkfish sends users to log in (e.g. `https://auth.example.com/oauth/authorize`).
* **Access Token URL** — the endpoint that exchanges the code for a token.
* **API Base URL** — the root of the service being integrated.
* **Redirect URL** — Pinkfish provides this value on the page. Copy it and register it with the upstream provider as an allowed redirect URI.
* **Client ID** and **Client Secret** — issued by the upstream provider when you register a new OAuth app.
* **Scopes** — space-separated list of permission scopes to request.
Advanced toggles include **Use PKCE**, **Send client credentials in request body**, and custom authorization/token params.
#### OAuth 2.0 — Client Credentials
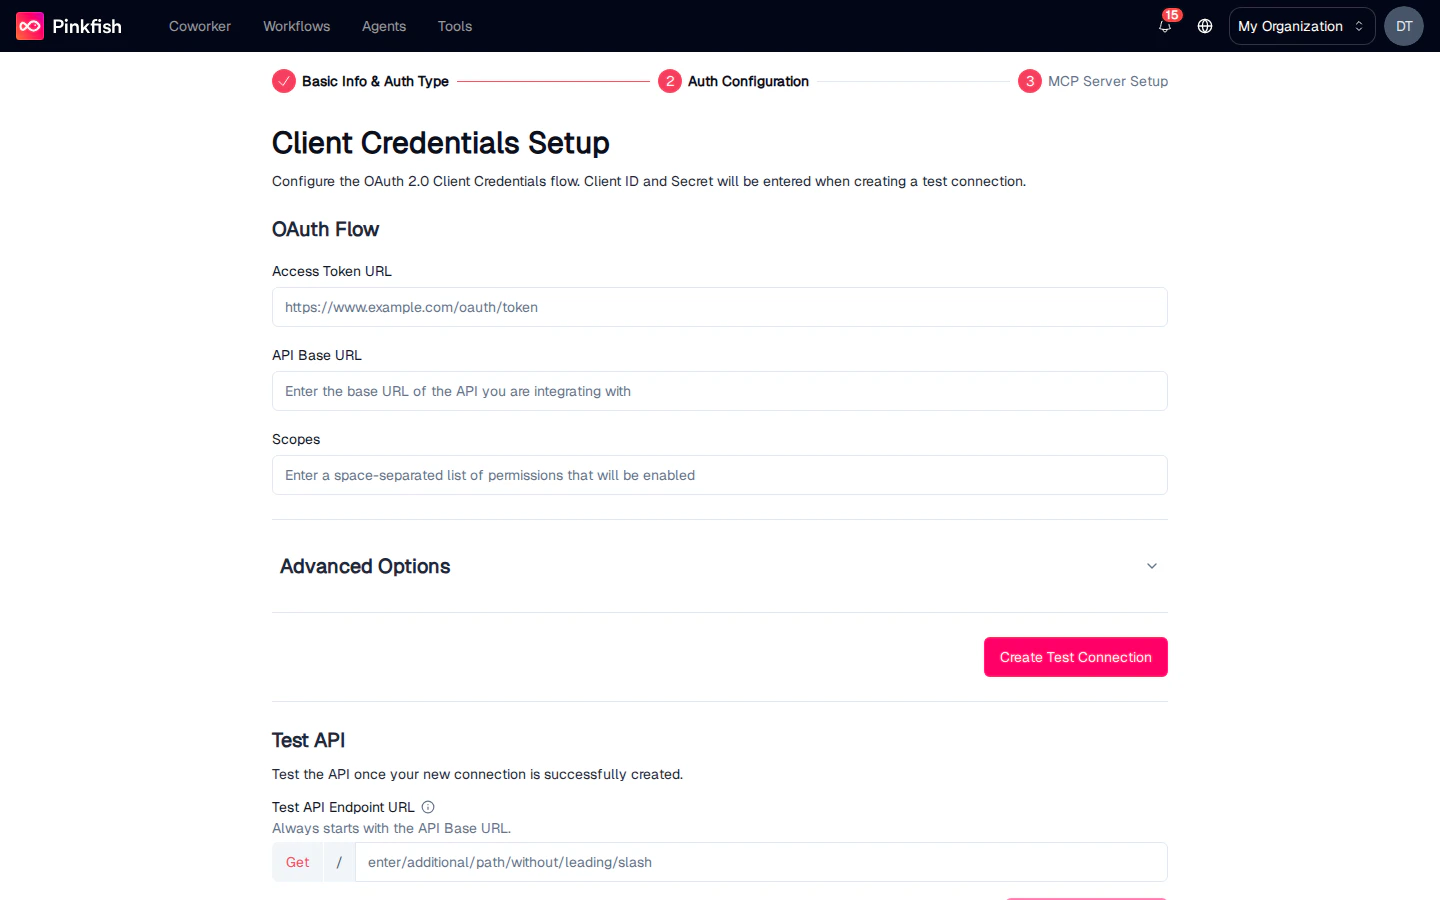 Server-to-server flow. Fields:
* **Access Token URL** — the token endpoint.
* **API Base URL** — the root URL.
* **Scopes** — space-separated scopes.
* **Client ID / Client Secret** — collected when each user connects, not here.
* **Test API** — validate with real credentials in the **Create Test Connection** side panel.
After each variant, click **Continue** to advance to Step 3.
### Step 3: MCP Server Setup
This is what makes a custom integration useful to agents. Map the integration to an existing MCP server, or generate a new one straight from your API's OpenAPI spec.
Server-to-server flow. Fields:
* **Access Token URL** — the token endpoint.
* **API Base URL** — the root URL.
* **Scopes** — space-separated scopes.
* **Client ID / Client Secret** — collected when each user connects, not here.
* **Test API** — validate with real credentials in the **Create Test Connection** side panel.
After each variant, click **Continue** to advance to Step 3.
### Step 3: MCP Server Setup
This is what makes a custom integration useful to agents. Map the integration to an existing MCP server, or generate a new one straight from your API's OpenAPI spec.
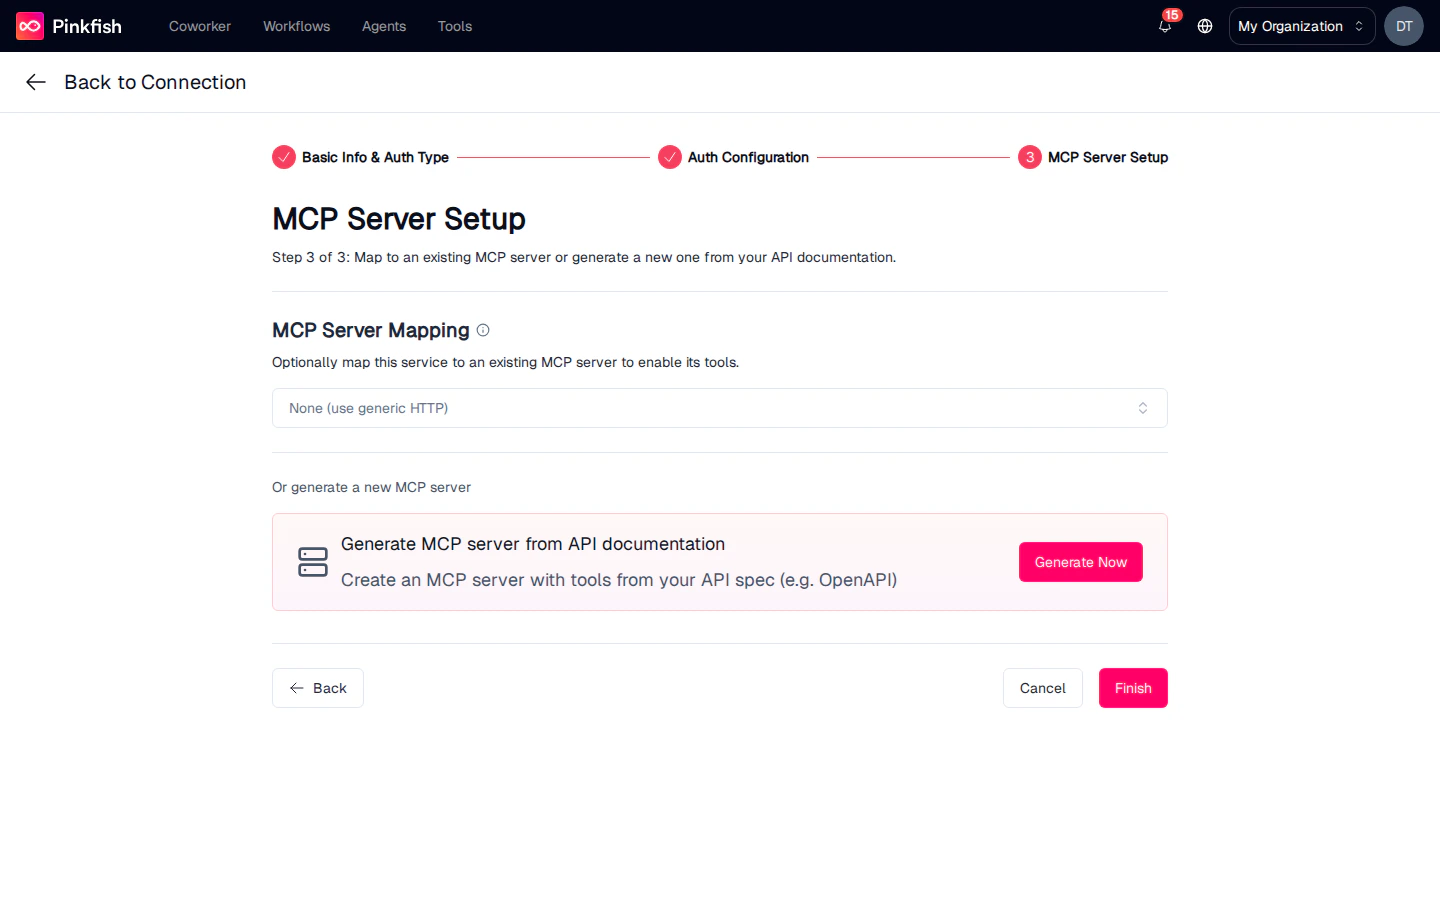 Click **Generate Now** on the "Generate MCP server from API documentation" card to open the generation modal.
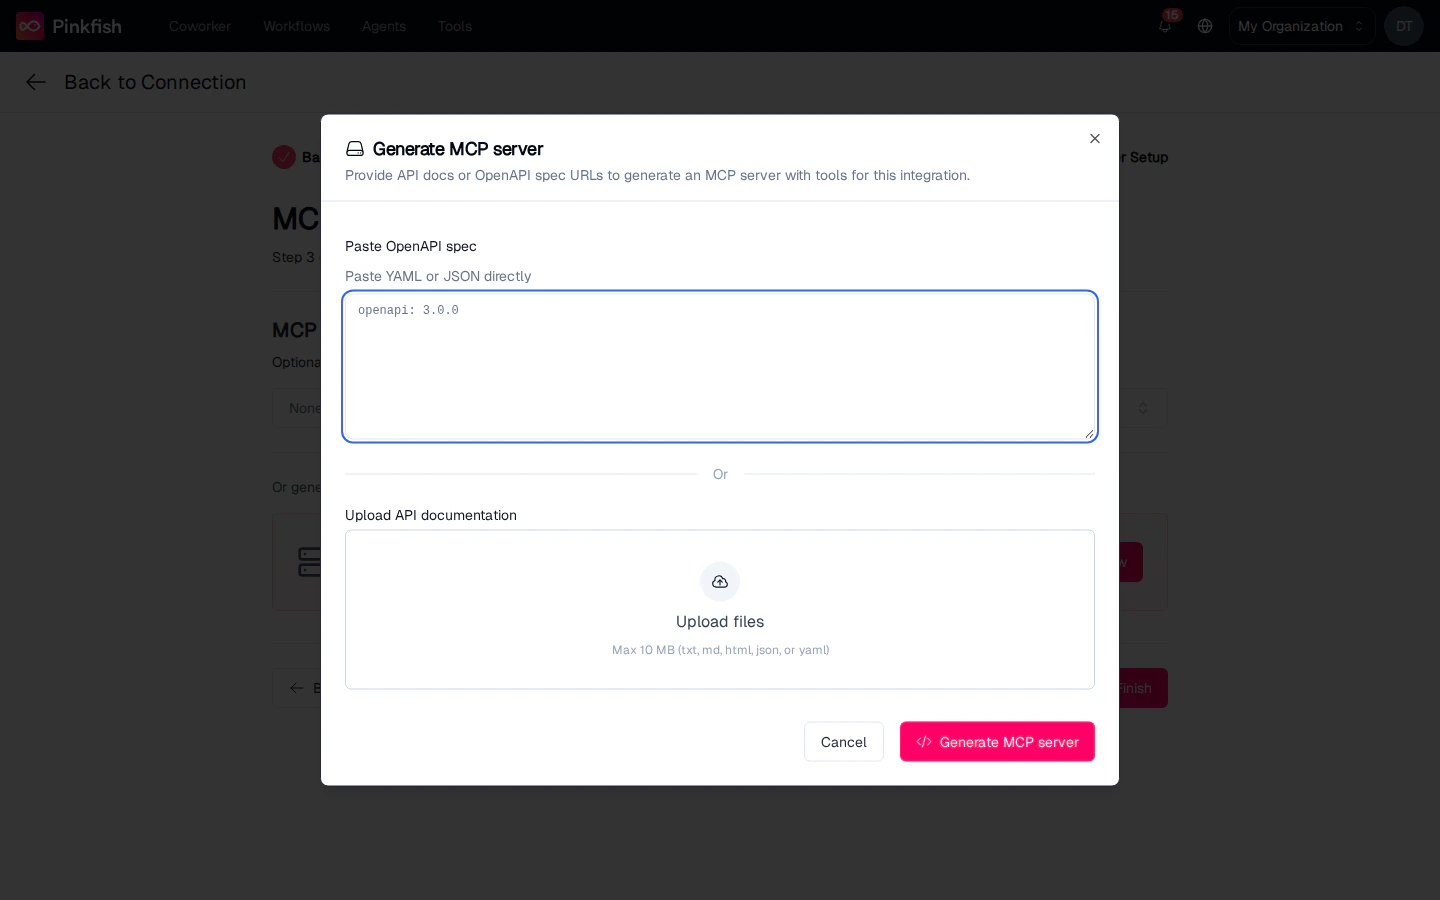 Two inputs:
* **Paste OpenAPI spec** — paste YAML or JSON directly into the textarea. Must be an OpenAPI 3.x document.
* **Upload API documentation** — drag and drop up to 10 MB of txt, md, html, json, or yaml files.
Click **Generate MCP server** and Pinkfish analyzes the spec, creates a new MCP server registered to your org, and generates one tool per operation. A toast confirms `MCP server "{name}" created with {N} tools`. The server will appear on the [Custom MCP Servers](/tools/custom-mcp-servers) page, and on the integration itself so connections built from it automatically get the new tools.
Click **Finish** on Step 3 to save the integration. It then shows up in the **Custom Apps** section of the Add Connection picker, available to every Builder in your org.
## Sharing and Permissions
Every connection has an owner and an ACL. Underneath, three permission bits govern what a holder may do:
| Permission | Allows |
| ---------- | ------------------------------------------------ |
| Read | Use the connection in workflows and agents |
| Write | Edit and delete |
| Admin | Share with other users or with your organization |
The share dialog exposes these as two choices — **Run** (read) and **Manage** (read, write, and share). Click **Share** on a row to grant either to named people or to your entire organization. Shared connections appear on the recipient's Connections list with the "Shared" indicator.
Sharing an agent or workflow does **not** share the connections it uses — credentials live on the connection, not on the agent. To make everyone run against one connection instead of their own, see [Tool Sharing and Identity](/tools/sharing-and-identity).
## Notes
* The Connections list paginates at 50 rows; use the search box to filter.
* Custom integrations are currently limited to OAuth 2.0 (Authorization Code + Client Credentials), API Key, and Basic Auth. Other flows (SAML, mTLS) aren't supported yet — contact [support@pinkfish.ai](mailto:support@pinkfish.ai) if you need them.
* Generated MCP servers are editable after creation — you can remove unwanted tools or adjust parameters from the [Custom MCP Servers](/tools/custom-mcp-servers) details panel.
* For services that don't expose an API at all, see [Browser Login](/tools/browser-login).
Two inputs:
* **Paste OpenAPI spec** — paste YAML or JSON directly into the textarea. Must be an OpenAPI 3.x document.
* **Upload API documentation** — drag and drop up to 10 MB of txt, md, html, json, or yaml files.
Click **Generate MCP server** and Pinkfish analyzes the spec, creates a new MCP server registered to your org, and generates one tool per operation. A toast confirms `MCP server "{name}" created with {N} tools`. The server will appear on the [Custom MCP Servers](/tools/custom-mcp-servers) page, and on the integration itself so connections built from it automatically get the new tools.
Click **Finish** on Step 3 to save the integration. It then shows up in the **Custom Apps** section of the Add Connection picker, available to every Builder in your org.
## Sharing and Permissions
Every connection has an owner and an ACL. Underneath, three permission bits govern what a holder may do:
| Permission | Allows |
| ---------- | ------------------------------------------------ |
| Read | Use the connection in workflows and agents |
| Write | Edit and delete |
| Admin | Share with other users or with your organization |
The share dialog exposes these as two choices — **Run** (read) and **Manage** (read, write, and share). Click **Share** on a row to grant either to named people or to your entire organization. Shared connections appear on the recipient's Connections list with the "Shared" indicator.
Sharing an agent or workflow does **not** share the connections it uses — credentials live on the connection, not on the agent. To make everyone run against one connection instead of their own, see [Tool Sharing and Identity](/tools/sharing-and-identity).
## Notes
* The Connections list paginates at 50 rows; use the search box to filter.
* Custom integrations are currently limited to OAuth 2.0 (Authorization Code + Client Credentials), API Key, and Basic Auth. Other flows (SAML, mTLS) aren't supported yet — contact [support@pinkfish.ai](mailto:support@pinkfish.ai) if you need them.
* Generated MCP servers are editable after creation — you can remove unwanted tools or adjust parameters from the [Custom MCP Servers](/tools/custom-mcp-servers) details panel.
* For services that don't expose an API at all, see [Browser Login](/tools/browser-login).