> ## Documentation Index
> Fetch the complete documentation index at: https://docs.pinkfish.ai/llms.txt
> Use this file to discover all available pages before exploring further.
# Organization Settings
> Admin-level controls for users, usage, billing, SSO, skills, models, API credentials, and channel integrations
Organization Settings is where administrators configure the shared behavior of an entire Pinkfish organization — inviting teammates, controlling log retention, managing billing, setting up SSO, publishing organization-wide skills and Saved Actions, minting API credentials, choosing default LLM models, and enabling channel integrations. Most sections are admin-only; read-only views are available to regular members where it makes sense.
Open **Settings** from the user menu and pick any item under the **ORGANIZATION** heading in the sidebar.
## Key Sections
Invite, edit, and remove organization members.
Workflow runs, credit burn, and analytics over time.
Global log verbosity for dev and production runs.
Plan details, invoices, and subscription management.
Parent and sub-organization hierarchy.
SAML identity provider configuration.
Organization-wide skills for all members' agents.
Opt out of the cross-organization code cache pool.
Ordered stages for promoting workflows across orgs.
OAuth 2.0 client credentials for programmatic access.
Enable Slack and Microsoft Teams for agents, and auto-onboard teammates by email domain.
Primary and fallback LLM models for the organization.
## Users
The **Users** page is the membership roster. Admins invite new members, change permissions, copy invite links, and remove accounts from here.
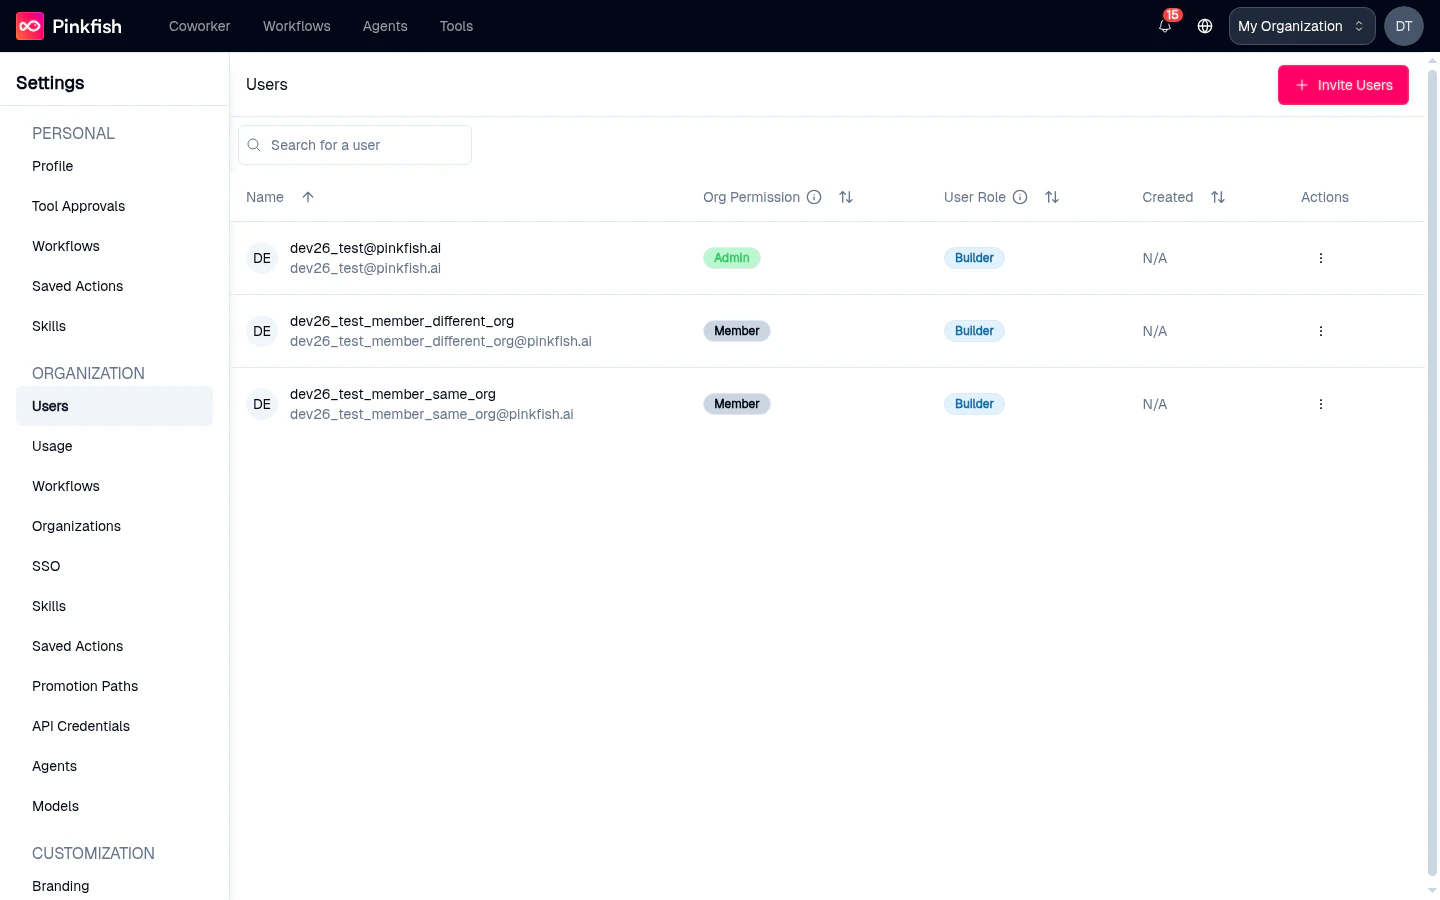 Each row shows:
* **Name**, avatar, and **profile image** — profile photos uploaded by the member render next to their name so you can identify them at a glance. Members without a photo fall back to an initials avatar.
* **Org Permission** — `Admin` or `Member`
* **User Role** — `Builder` or `End User`
* **Created** date
* **Actions** menu — edit, copy invite link, resend invite, revoke invite (for pending invites), or remove user (for accepted members)
Pending invitees get a **Pending** badge next to their name until they accept. Hover the info tooltips on the column headers for the full definition of each role. The **Invite Users** button is disabled when the organization has no available seats.
## Usage
The **Usage** section is the operational dashboard for the organization — how many runs, how many credits consumed, and who drove the work.
Each row shows:
* **Name**, avatar, and **profile image** — profile photos uploaded by the member render next to their name so you can identify them at a glance. Members without a photo fall back to an initials avatar.
* **Org Permission** — `Admin` or `Member`
* **User Role** — `Builder` or `End User`
* **Created** date
* **Actions** menu — edit, copy invite link, resend invite, revoke invite (for pending invites), or remove user (for accepted members)
Pending invitees get a **Pending** badge next to their name until they accept. Hover the info tooltips on the column headers for the full definition of each role. The **Invite Users** button is disabled when the organization has no available seats.
## Usage
The **Usage** section is the operational dashboard for the organization — how many runs, how many credits consumed, and who drove the work.
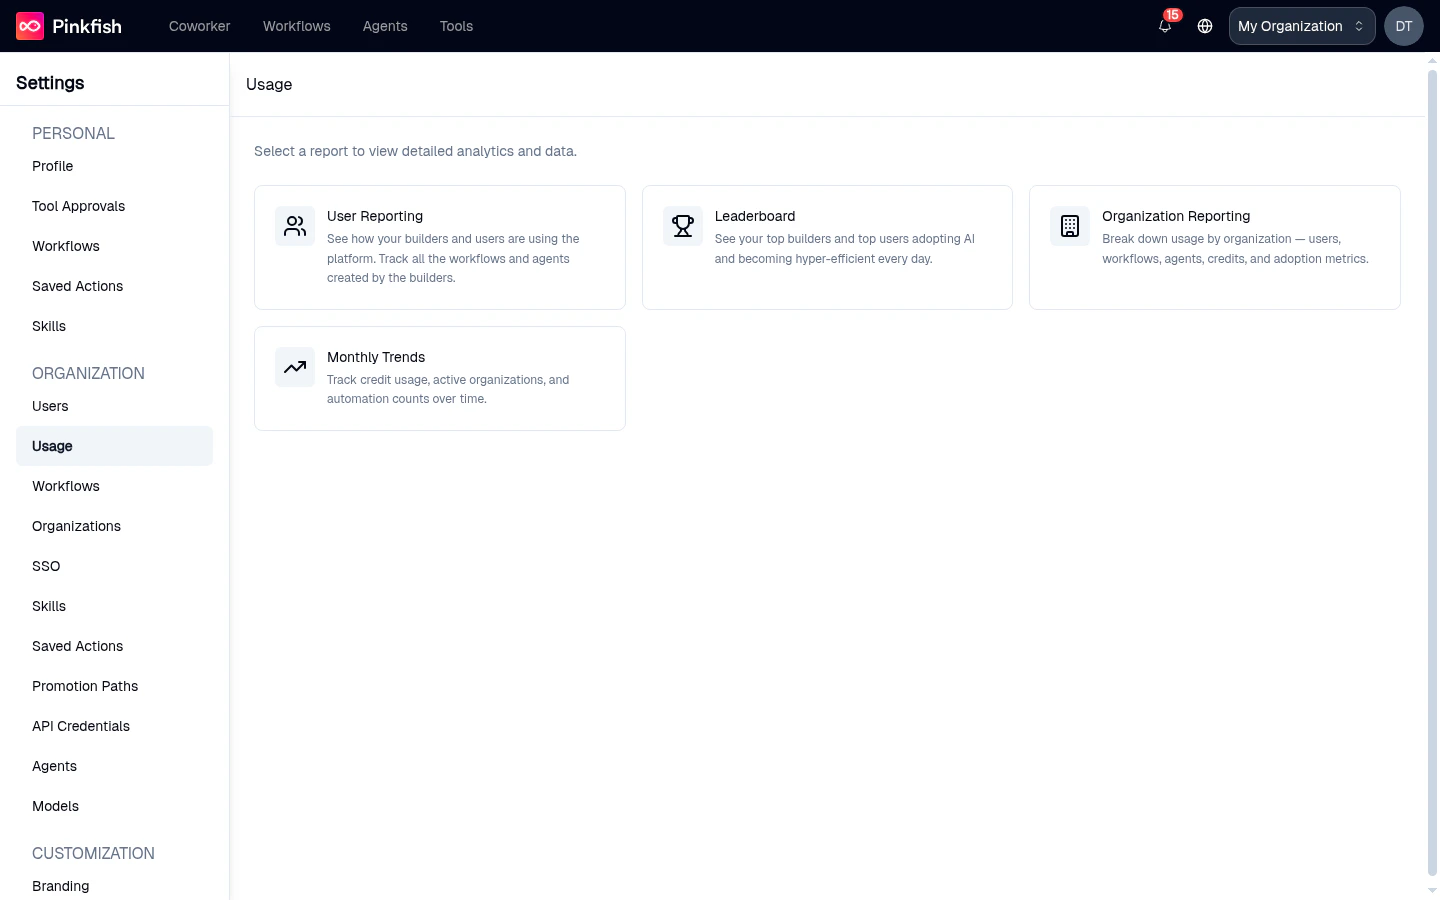 Choose a report from the top:
* **User Reporting** — breakdown of runs and credits per member
* **Leaderboard** — top users by workflow execution
* **Organization Reporting** — agent, skill, and session usage at the org level
* **Monthly Trends** — month-over-month activity chart
Each report supports date-range selection (Last 24 hours, Last 7 days, Last Month, or a custom range) and CSV export for daily summaries. The classic Recent Runs / Daily Summary table view is available by toggling off the new dashboard.
## Workflows
The organization **Workflows** page controls log verbosity for every workflow in the org. These settings exist so you can tune how much data Pinkfish retains per run — useful for GDPR/HIPAA compliance.
Choose a report from the top:
* **User Reporting** — breakdown of runs and credits per member
* **Leaderboard** — top users by workflow execution
* **Organization Reporting** — agent, skill, and session usage at the org level
* **Monthly Trends** — month-over-month activity chart
Each report supports date-range selection (Last 24 hours, Last 7 days, Last Month, or a custom range) and CSV export for daily summaries. The classic Recent Runs / Daily Summary table view is available by toggling off the new dashboard.
## Workflows
The organization **Workflows** page controls log verbosity for every workflow in the org. These settings exist so you can tune how much data Pinkfish retains per run — useful for GDPR/HIPAA compliance.
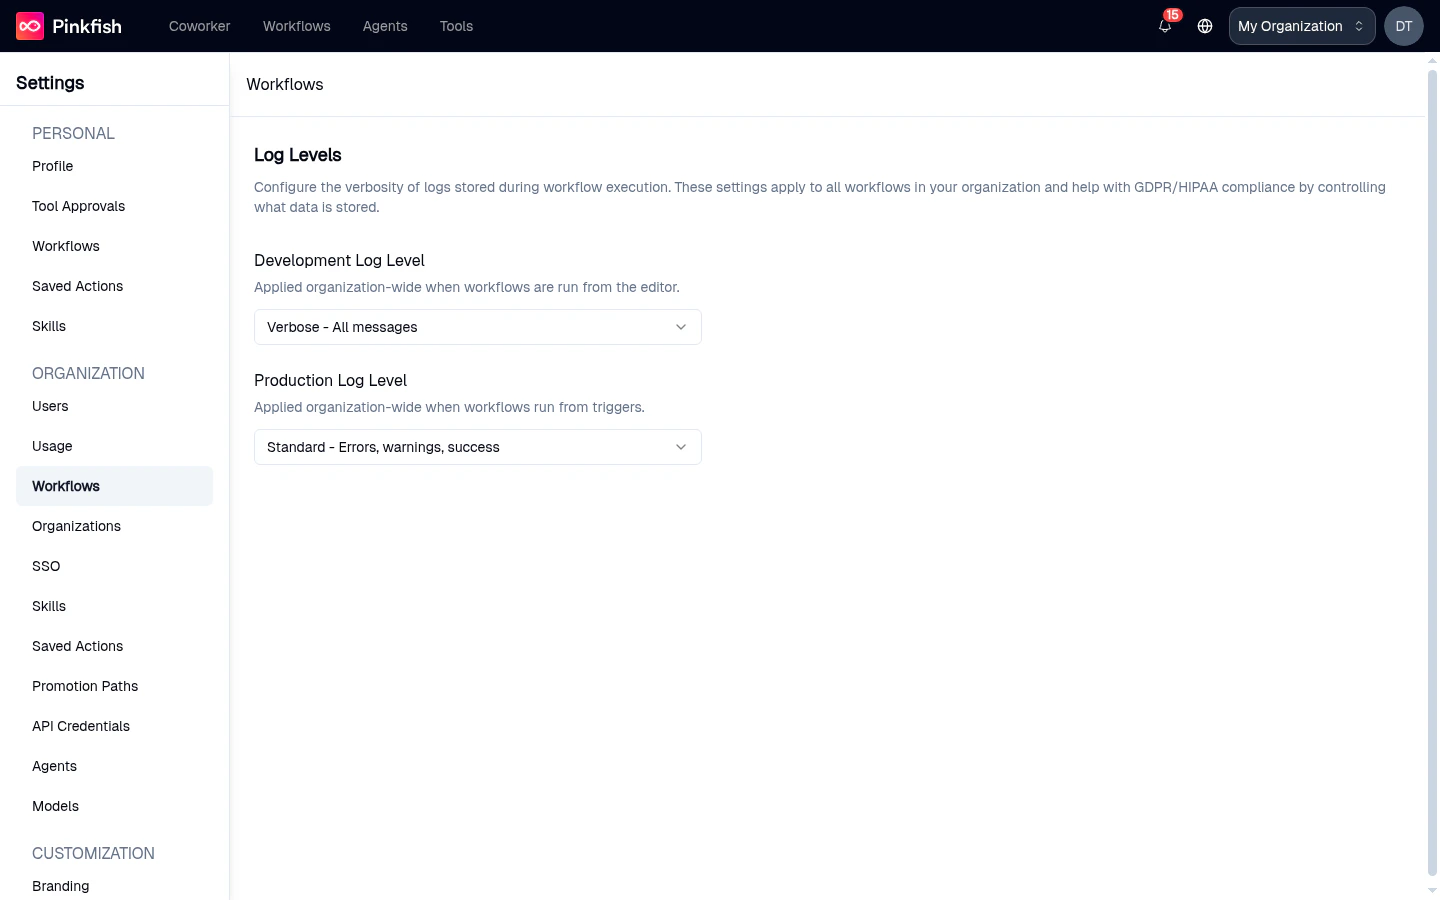 Two dropdowns, each with the same four levels:
* **None** — don't store logs
* **Minimal** — errors only
* **Standard** — errors, warnings, and success messages
* **Verbose** — all messages
The **Development Log Level** applies when workflows run from the editor; the **Production Log Level** applies when they run from triggers. Both apply organization-wide and take effect immediately.
## Billing
The **Billing** page shows your current plan, credit consumption, and subscription controls. It's hidden for enterprise organizations — enterprise billing runs through the dedicated Pinkfish billing process — and only plan modification actions are restricted to admins.
Typical elements on this page:
* **Your Current Plan** card with plan name, subscription type (Weekly / Monthly / Annual), included credits, usage cost, credits refresh date, total credits used, and a usage bar chart
* **Manage Plan** / **Upgrade Plan** / **Reactivate Plan** (label depends on status)
* **Invoices and Payment** and **Update Payment Info** buttons
* **Cancel Subscription** link
* Links to learn more about plans and usage pricing
See [Pricing](/billing/pricing) and [Credits](/billing/credits) for the broader billing model.
## Organizations
The **Organizations** page shows the organization hierarchy available to your account. For enterprise prime organizations this is where you create and manage sub-organizations.
Two dropdowns, each with the same four levels:
* **None** — don't store logs
* **Minimal** — errors only
* **Standard** — errors, warnings, and success messages
* **Verbose** — all messages
The **Development Log Level** applies when workflows run from the editor; the **Production Log Level** applies when they run from triggers. Both apply organization-wide and take effect immediately.
## Billing
The **Billing** page shows your current plan, credit consumption, and subscription controls. It's hidden for enterprise organizations — enterprise billing runs through the dedicated Pinkfish billing process — and only plan modification actions are restricted to admins.
Typical elements on this page:
* **Your Current Plan** card with plan name, subscription type (Weekly / Monthly / Annual), included credits, usage cost, credits refresh date, total credits used, and a usage bar chart
* **Manage Plan** / **Upgrade Plan** / **Reactivate Plan** (label depends on status)
* **Invoices and Payment** and **Update Payment Info** buttons
* **Cancel Subscription** link
* Links to learn more about plans and usage pricing
See [Pricing](/billing/pricing) and [Credits](/billing/credits) for the broader billing model.
## Organizations
The **Organizations** page shows the organization hierarchy available to your account. For enterprise prime organizations this is where you create and manage sub-organizations.
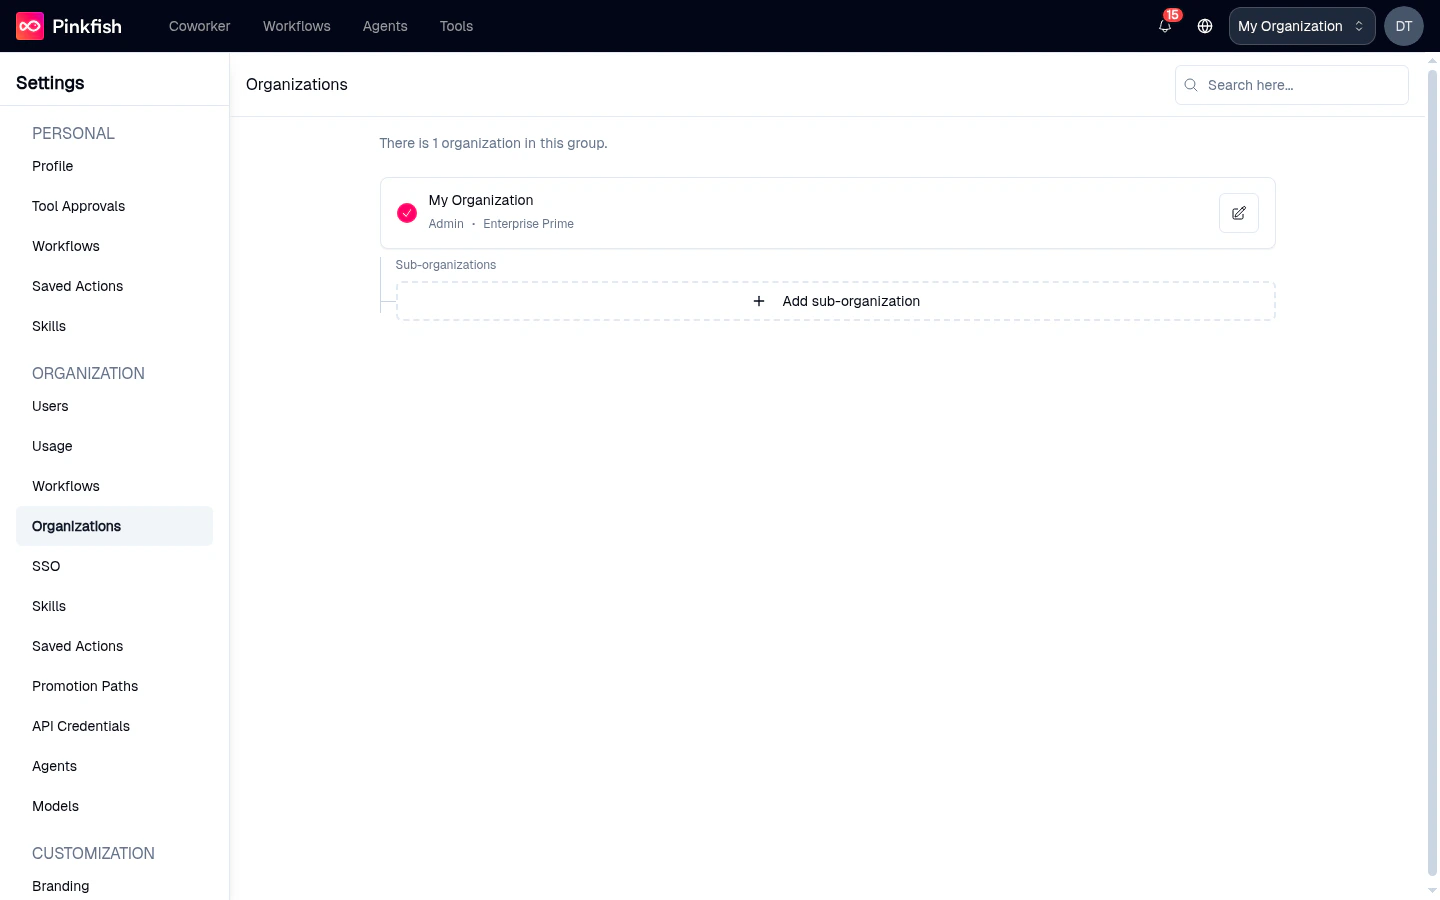 The page header tells you how many organizations are in your group. Each organization is shown as a card with its name, your role (`Admin`), and the plan (`Enterprise Prime`, etc.). Click the pencil icon to edit the organization's details or the card itself to switch into it. The **Sub-organizations** panel lists children underneath the parent; click **+ Add sub-organization** to spin up a new child org (enterprise prime admins only). The search box filters the list when you have many orgs.
## SSO
The **SSO** page walks you through configuring SAML 2.0 Single Sign-On. It's an Enterprise-plan feature and is only configurable from the **parent** organization in a multi-org group.
The page header tells you how many organizations are in your group. Each organization is shown as a card with its name, your role (`Admin`), and the plan (`Enterprise Prime`, etc.). Click the pencil icon to edit the organization's details or the card itself to switch into it. The **Sub-organizations** panel lists children underneath the parent; click **+ Add sub-organization** to spin up a new child org (enterprise prime admins only). The search box filters the list when you have many orgs.
## SSO
The **SSO** page walks you through configuring SAML 2.0 Single Sign-On. It's an Enterprise-plan feature and is only configurable from the **parent** organization in a multi-org group.
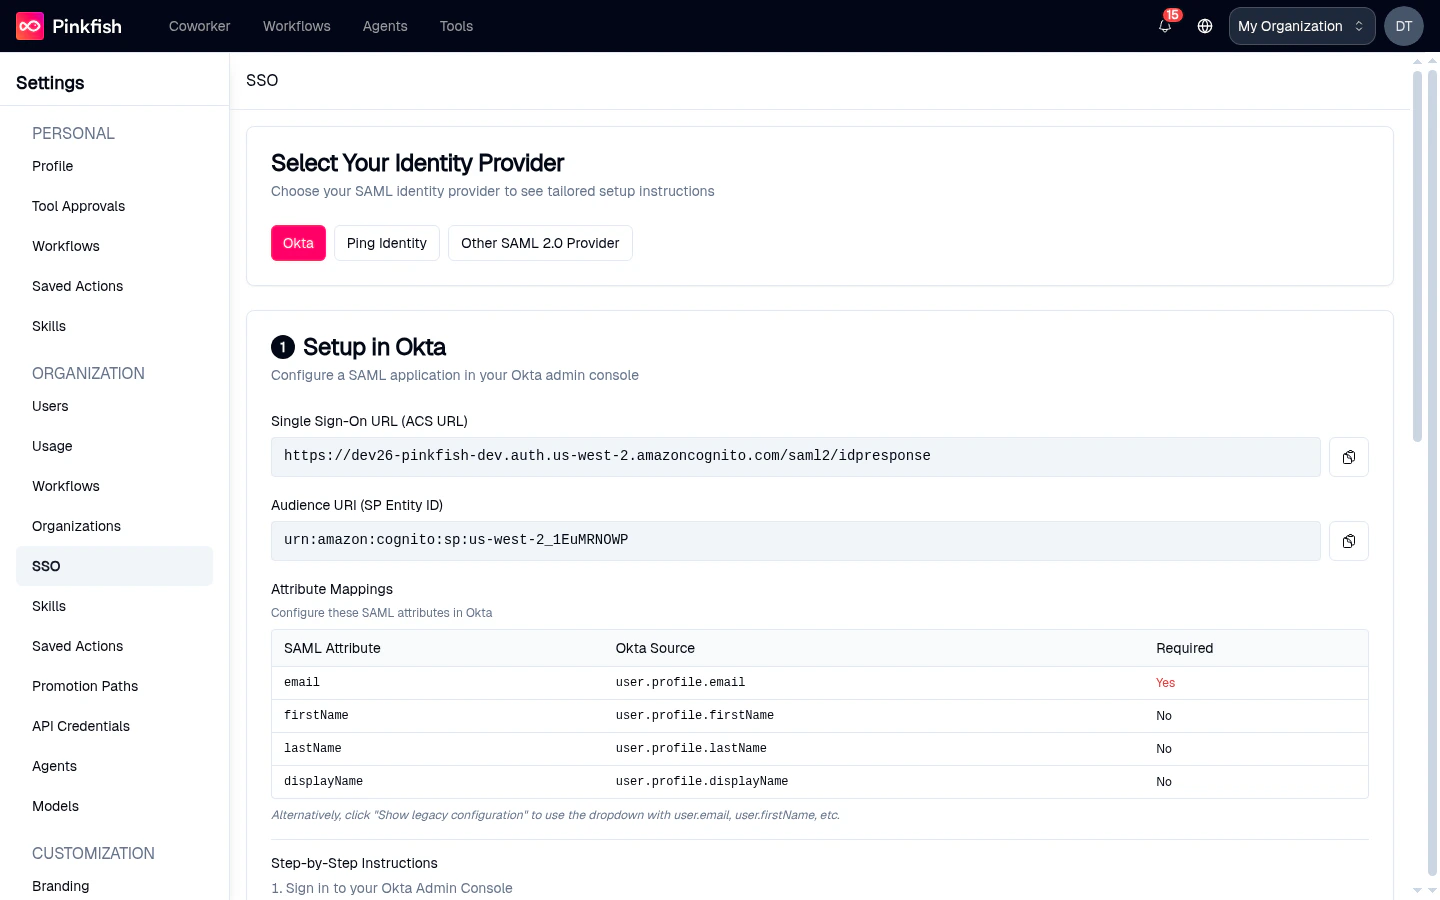 The page is split into two steps:
1. **Select Your Identity Provider** — pick a preset (Okta, Google Workspace, Microsoft Entra, Ping Identity, Other SAML 2.0 Provider). The page then shows provider-specific instructions.
2. **Setup in {Provider}** — the Single Sign-On URL (ACS URL), Audience URI, a table of required SAML attribute mappings (`email`, `firstName`, `lastName`, and others), and numbered step-by-step instructions for that provider.
Once you've configured the IdP, paste the metadata URL into the form below, specify the email domain that should be routed through SSO, and toggle **Enforce domain** to require SSO for users on that domain. The form also has an **Enable / Disable** switch so you can stage setup without cutting over.
Non-enterprise organizations see an **Enterprise Feature** notice; non-admins see **Access Restricted**; sub-orgs are told to configure SSO from the parent org.
## Skills (Organization)
Organization-wide skills work like [personal skills](/organization/settings-personal#skills), but every member's agents can discover them. Use them to capture house style, compliance rules, or shared domain knowledge.
The page is split into two steps:
1. **Select Your Identity Provider** — pick a preset (Okta, Google Workspace, Microsoft Entra, Ping Identity, Other SAML 2.0 Provider). The page then shows provider-specific instructions.
2. **Setup in {Provider}** — the Single Sign-On URL (ACS URL), Audience URI, a table of required SAML attribute mappings (`email`, `firstName`, `lastName`, and others), and numbered step-by-step instructions for that provider.
Once you've configured the IdP, paste the metadata URL into the form below, specify the email domain that should be routed through SSO, and toggle **Enforce domain** to require SSO for users on that domain. The form also has an **Enable / Disable** switch so you can stage setup without cutting over.
Non-enterprise organizations see an **Enterprise Feature** notice; non-admins see **Access Restricted**; sub-orgs are told to configure SSO from the parent org.
## Skills (Organization)
Organization-wide skills work like [personal skills](/organization/settings-personal#skills), but every member's agents can discover them. Use them to capture house style, compliance rules, or shared domain knowledge.
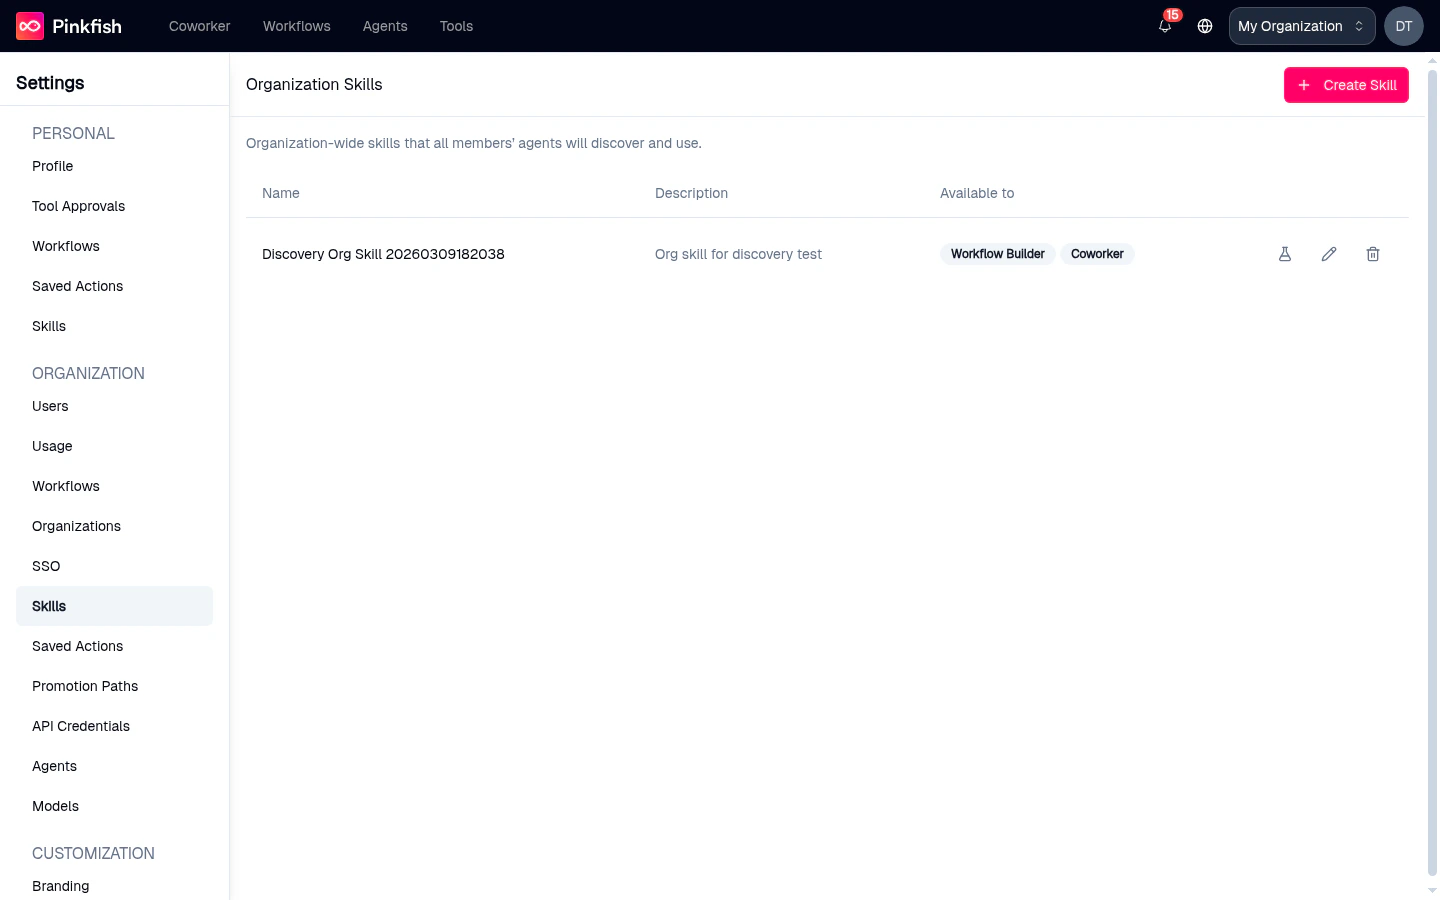 The table format is identical to personal skills (Name, Description, Available to, Actions). The page header reads **Organization-wide skills that all members' agents will discover and use.** Only organization admins can create, edit, or delete entries.
## Saved Actions (Organization)
The organization **Saved Actions** page has a single control: an opt-out toggle for the shared global pool.
The table format is identical to personal skills (Name, Description, Available to, Actions). The page header reads **Organization-wide skills that all members' agents will discover and use.** Only organization admins can create, edit, or delete entries.
## Saved Actions (Organization)
The organization **Saved Actions** page has a single control: an opt-out toggle for the shared global pool.
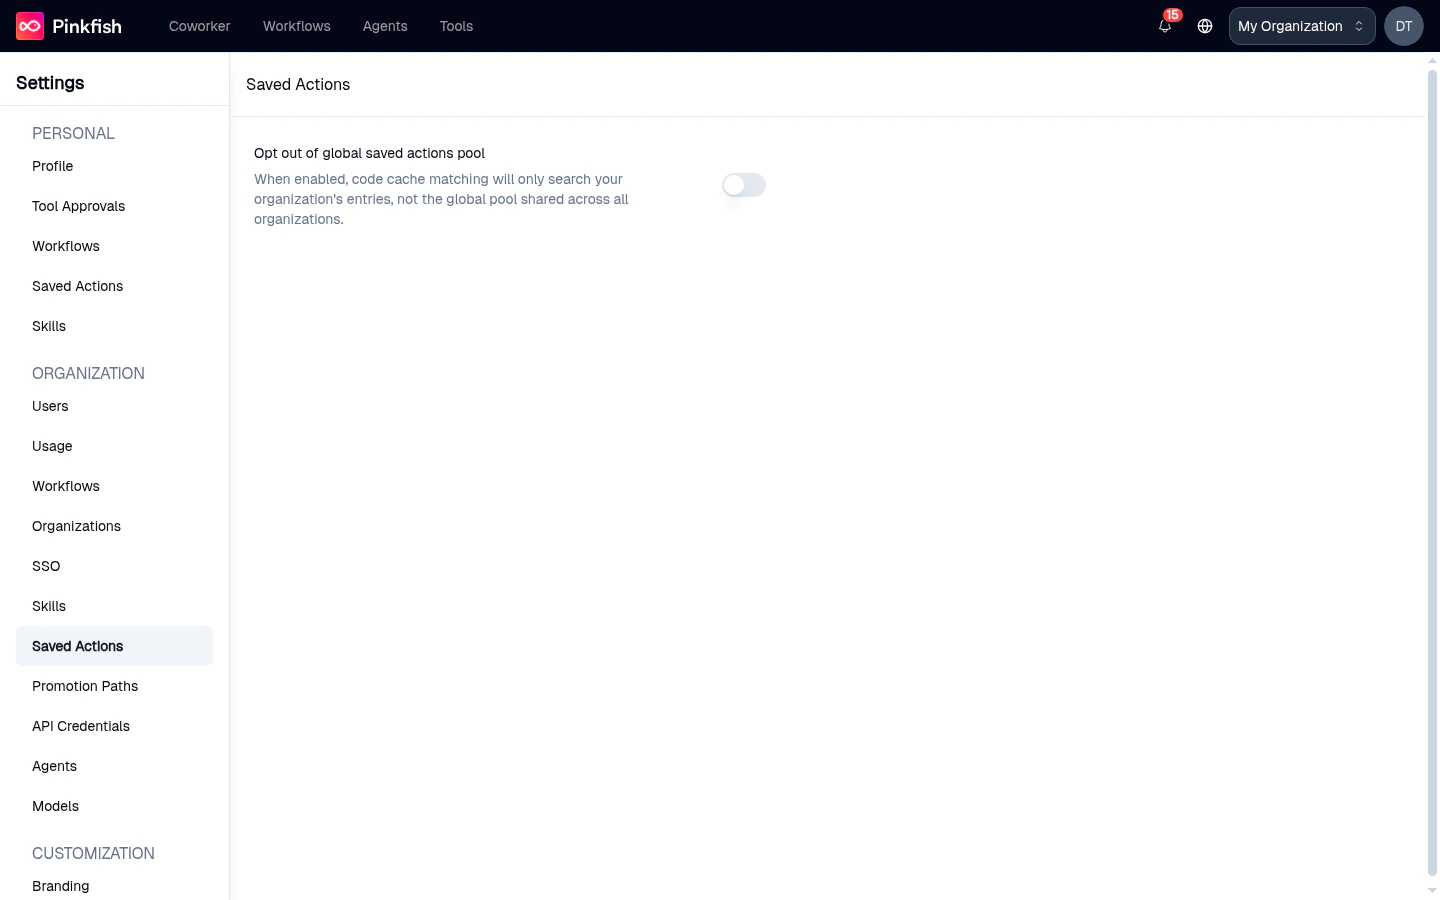 When the toggle is on, code cache matching only searches your organization's own Saved Actions — it will not pull from the pool shared across all Pinkfish organizations. This is useful for organizations with strict data-isolation requirements.
## Promotion Paths
Promotion Paths define ordered pipelines for moving workflows between organizations — a common pattern is `dev → staging → prod`, where each stage maps a workflow tag to a target org.
When the toggle is on, code cache matching only searches your organization's own Saved Actions — it will not pull from the pool shared across all Pinkfish organizations. This is useful for organizations with strict data-isolation requirements.
## Promotion Paths
Promotion Paths define ordered pipelines for moving workflows between organizations — a common pattern is `dev → staging → prod`, where each stage maps a workflow tag to a target org.
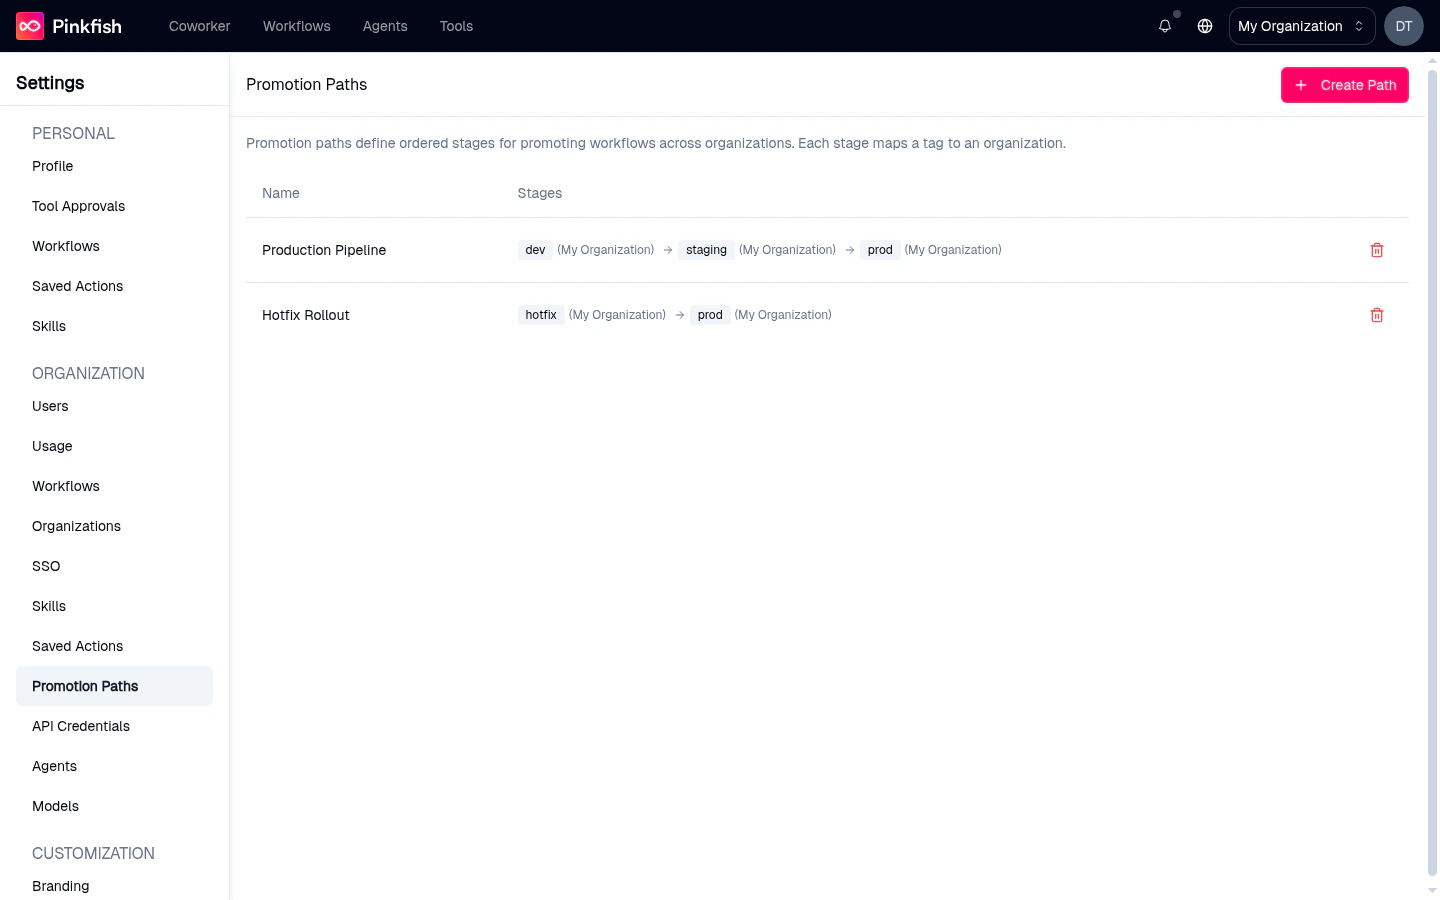 The page header reads **Promotion paths define ordered stages for promoting workflows across organizations. Each stage maps a tag to an organization.** When no paths exist yet, the empty state says `No promotion paths yet. Create one to get started.`
Click **Create Path** to open the dialog: give the path a name, then add one stage at a time — each stage pairs a workflow tag (e.g. `staging`) with a destination organization. Paths must have at least two stages and each stage's tag must be unique. Once saved, existing paths appear as rows in a table with two columns — **Name** and **Stages** — plus a trash icon to delete the path. Each stage is rendered as a small tag chip followed by the target organization name in parentheses, and consecutive stages are joined by `→` arrows (for example `dev (My Organization) → staging (My Organization) → prod (My Organization)`).
> Promotion Paths is feature-flag gated and may not be enabled for every organization. If you don't see it in the sidebar, ask your Pinkfish contact to turn it on.
## API Credentials
The **API Credentials** page is where organization admins mint OAuth 2.0 client credentials for programmatic access to Pinkfish APIs.
The page header reads **Promotion paths define ordered stages for promoting workflows across organizations. Each stage maps a tag to an organization.** When no paths exist yet, the empty state says `No promotion paths yet. Create one to get started.`
Click **Create Path** to open the dialog: give the path a name, then add one stage at a time — each stage pairs a workflow tag (e.g. `staging`) with a destination organization. Paths must have at least two stages and each stage's tag must be unique. Once saved, existing paths appear as rows in a table with two columns — **Name** and **Stages** — plus a trash icon to delete the path. Each stage is rendered as a small tag chip followed by the target organization name in parentheses, and consecutive stages are joined by `→` arrows (for example `dev (My Organization) → staging (My Organization) → prod (My Organization)`).
> Promotion Paths is feature-flag gated and may not be enabled for every organization. If you don't see it in the sidebar, ask your Pinkfish contact to turn it on.
## API Credentials
The **API Credentials** page is where organization admins mint OAuth 2.0 client credentials for programmatic access to Pinkfish APIs.
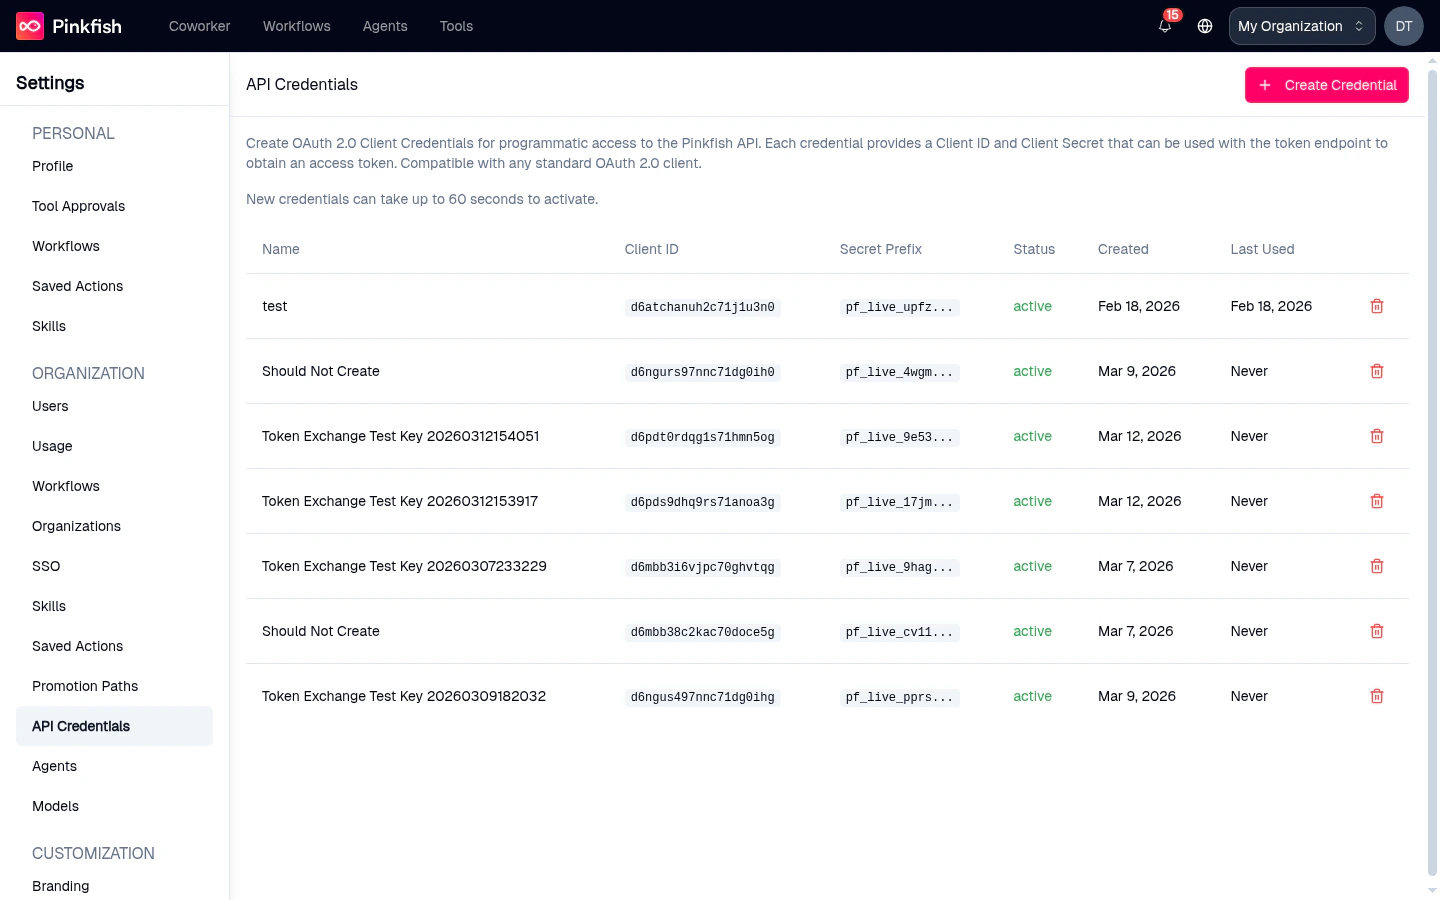 Each row shows:
* **Name** — your label for the credential
* **Client ID** — copyable
* **Secret Prefix** — the first few characters of the secret, masked
* **Status** — `active`, etc.
* **Created** date
* **Last Used** — when the credential last minted a token
* **Delete** action
Click **Create Credential**, give it a name, and Pinkfish returns both the Client ID and the full Client Secret — copy them immediately because the secret is only shown once. The dialog also includes copy-ready curl commands for exchanging credentials for an access token and calling an MCP server.
New credentials can take up to 60 seconds to activate. This section is only available on enterprise plans.
## Channels
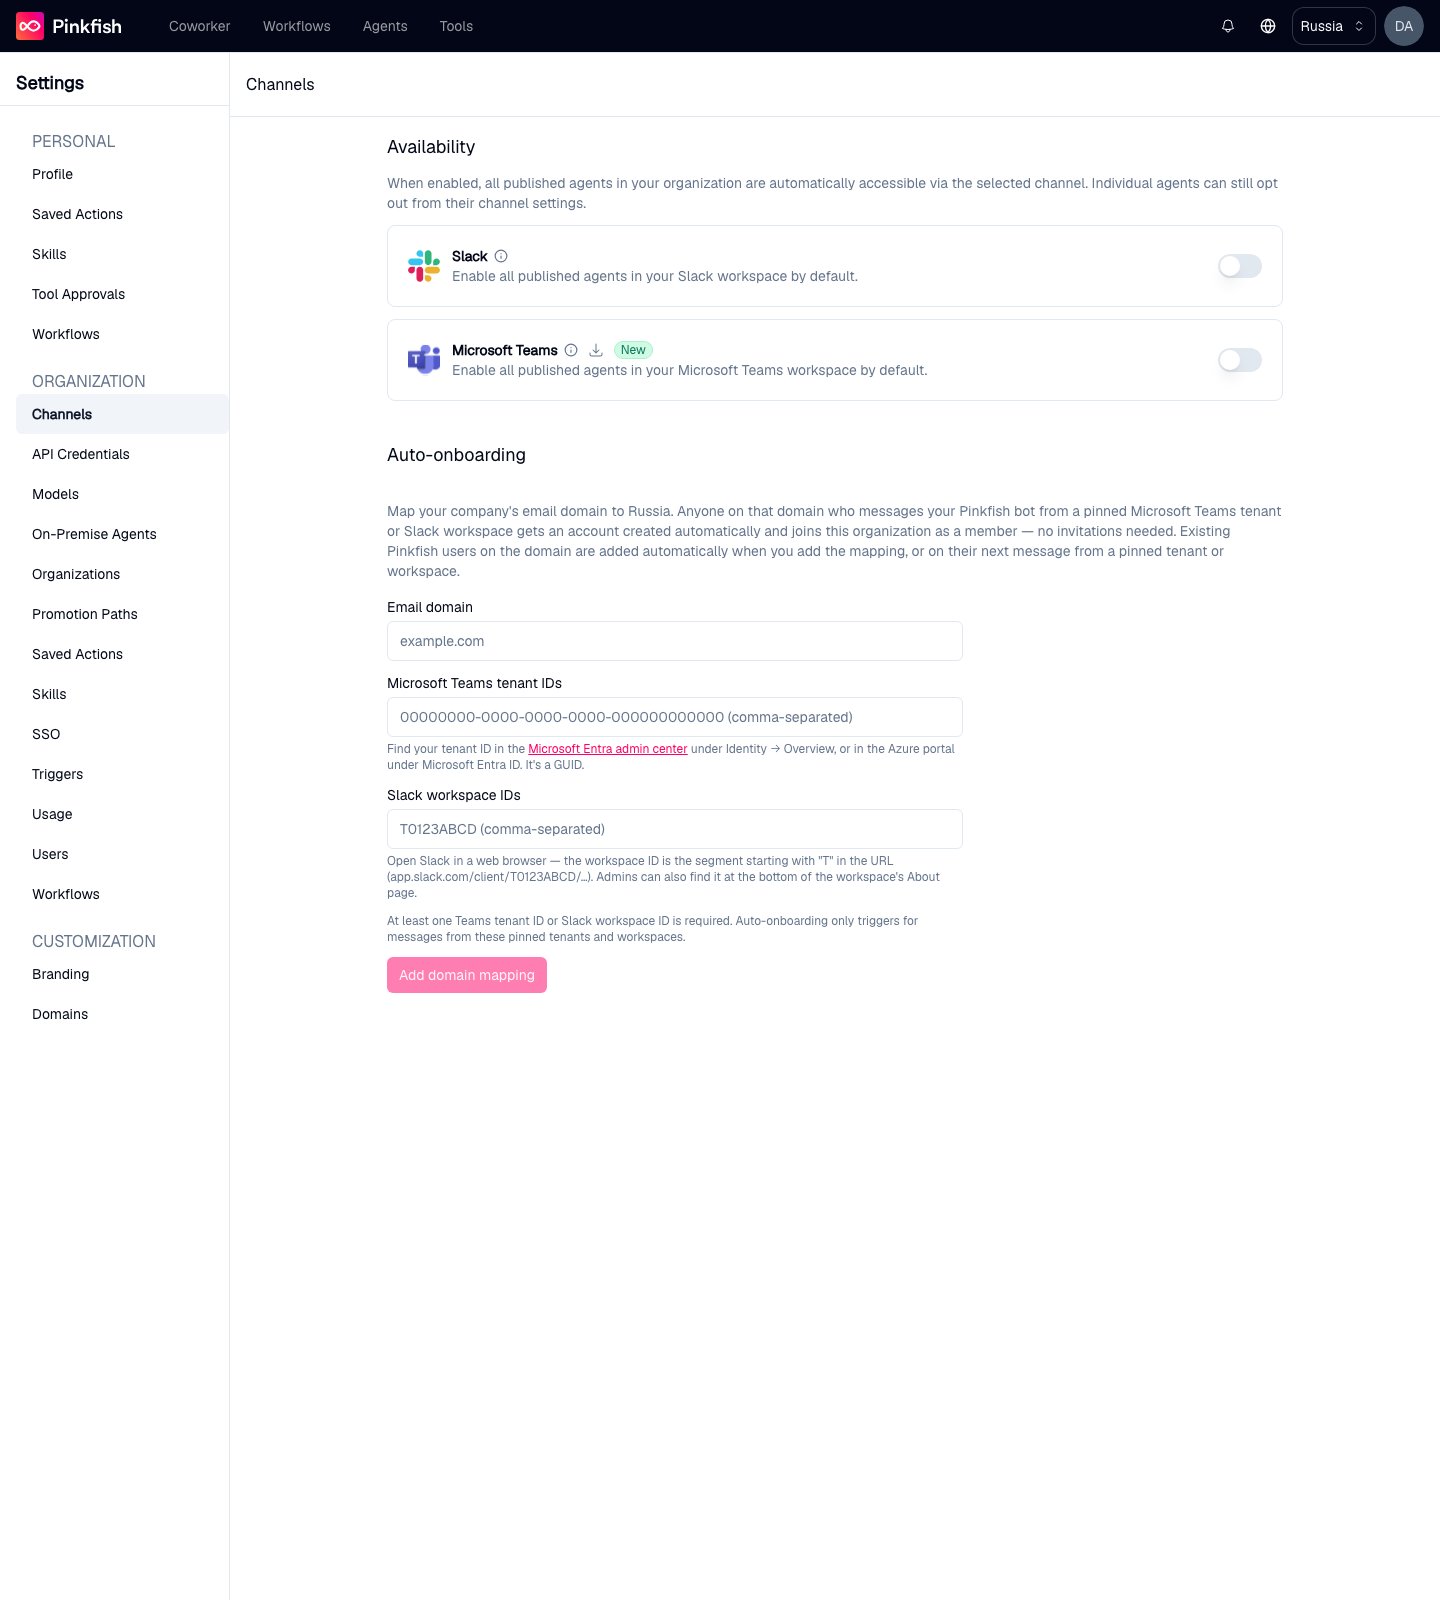
The **Channels** page is where organization admins manage how Slack and Microsoft Teams work for the organization. It has two sections: **Availability** (turn the channels on for published agents) and **Auto-onboarding** (let teammates join automatically by email domain).
Each row shows:
* **Name** — your label for the credential
* **Client ID** — copyable
* **Secret Prefix** — the first few characters of the secret, masked
* **Status** — `active`, etc.
* **Created** date
* **Last Used** — when the credential last minted a token
* **Delete** action
Click **Create Credential**, give it a name, and Pinkfish returns both the Client ID and the full Client Secret — copy them immediately because the secret is only shown once. The dialog also includes copy-ready curl commands for exchanging credentials for an access token and calling an MCP server.
New credentials can take up to 60 seconds to activate. This section is only available on enterprise plans.
## Channels
The **Channels** page is where organization admins manage how Slack and Microsoft Teams work for the organization. It has two sections: **Availability** (turn the channels on for published agents) and **Auto-onboarding** (let teammates join automatically by email domain).
 ### Availability
The **Availability** section toggles the channel integrations that expose published agents outside the Pinkfish app. The header explains the behavior:
> When enabled, all published agents in your organization are automatically accessible via the selected channel. Individual agents can still opt out from their channel settings.
Each row represents one channel — currently Slack and Microsoft Teams — with its logo, name, a short description, and an enable/disable toggle. Hover the **info tooltip** next to each channel name for a quick explanation of what turning the channel on does for every published agent in the organization.
#### Teams setup walkthrough
For Microsoft Teams, clicking the **Download App** button opens the **Set up Pinkfish for Teams** guided modal. The modal walks an admin through the full install:
1. Download the environment-specific ZIP package.
2. Upload the ZIP in **Teams → Apps → Manage your apps**.
3. Add the app from **Built for your org**.
4. Confirm the install and open the bot.
Each step in the modal includes a labeled screenshot so administrators can follow along without switching between tabs. See [Microsoft Teams — Admin setup](/channels/microsoft-teams#admin-install-the-pinkfish-app-in-teams) for the end-to-end walkthrough with screenshots.
### Auto-onboarding
The **Auto-onboarding** section maps your company's email domain to the organization so teammates join automatically the first time they message a Pinkfish agent from [Slack](/channels/slack) or [Microsoft Teams](/channels/microsoft-teams) — no invitations and no sign-in card. Like SSO, it's an Enterprise-plan feature. In a multi-org group, child organizations configure their own mappings rather than inheriting the parent's.
A mapping has three parts:
1. **Email domain** — the company domain to claim (for example `acme.com`). Public email providers such as `gmail.com` are rejected. The same domain may be claimed by more than one organization, as long as each claims a different Slack workspace or Teams tenant — it's the pairing of domain and workspace that must be unique.
2. **Microsoft Teams tenant IDs** — the Azure AD tenant(s) whose Teams messages may trigger auto-onboarding. Find your tenant ID in the [Microsoft Entra admin center](https://entra.microsoft.com) under **Identity → Overview** (it's a GUID).
3. **Slack workspace IDs** — the Slack workspace(s) whose messages may trigger auto-onboarding. Open Slack in a web browser: the workspace ID is the segment starting with `T` in the URL (`app.slack.com/client/T0123ABCD/…`).
At least one Teams tenant ID or Slack workspace ID is required, and channel-triggered onboarding only ever fires for messages that come from one of those pinned tenants or workspaces — a matching email address messaging from anywhere else is ignored. Comma-separate multiple IDs. Separately, someone who **signs up on the Pinkfish web app** with a verified email on the mapped domain also joins the organization automatically (web signup itself requires an invitation; the pinned IDs apply only to channel messages, where the email is asserted by the platform rather than verified by sign-up).
Once a mapping is active:
* **New teammates** who message the bot from a pinned tenant or workspace get a Pinkfish account created automatically and join the organization as **members** (not builders). Their message routes straight to an agent. Admins can promote individual users from the [Users](#users) page later, and anyone the admin has removed stays removed — auto-onboarding never overrides a role change or removal.
* **Existing Pinkfish users** on the domain are added as members automatically — a background sweep runs when the mapping is created (it retries itself if interrupted), and anyone it misses is added on their next message from a pinned tenant or workspace.
* Auto-onboarded users don't get a personal "My Organization" — they belong to the mapped organization only, mirroring how SSO-provisioned users work. They can later sign in on the web with the same email (use **Forgot password** to set one) and land in the same account.
Mappings are listed under the form with their pinned IDs; remove one with the **×** button (a confirmation dialog guards against accidents). Removing a mapping stops future auto-onboarding but doesn't remove anyone who already joined.
Non-enterprise organizations see an **Enterprise Feature** notice, and non-admins see a permission notice.
## Models
The **Models** page is where you configure Bring Your Own Model (BYOM) — connecting your own Anthropic or OpenAI account so your organization's agents, workflows, and Coworker sessions run on your models (and bill tokens to your provider, not your Pinkfish credits).
### Availability
The **Availability** section toggles the channel integrations that expose published agents outside the Pinkfish app. The header explains the behavior:
> When enabled, all published agents in your organization are automatically accessible via the selected channel. Individual agents can still opt out from their channel settings.
Each row represents one channel — currently Slack and Microsoft Teams — with its logo, name, a short description, and an enable/disable toggle. Hover the **info tooltip** next to each channel name for a quick explanation of what turning the channel on does for every published agent in the organization.
#### Teams setup walkthrough
For Microsoft Teams, clicking the **Download App** button opens the **Set up Pinkfish for Teams** guided modal. The modal walks an admin through the full install:
1. Download the environment-specific ZIP package.
2. Upload the ZIP in **Teams → Apps → Manage your apps**.
3. Add the app from **Built for your org**.
4. Confirm the install and open the bot.
Each step in the modal includes a labeled screenshot so administrators can follow along without switching between tabs. See [Microsoft Teams — Admin setup](/channels/microsoft-teams#admin-install-the-pinkfish-app-in-teams) for the end-to-end walkthrough with screenshots.
### Auto-onboarding
The **Auto-onboarding** section maps your company's email domain to the organization so teammates join automatically the first time they message a Pinkfish agent from [Slack](/channels/slack) or [Microsoft Teams](/channels/microsoft-teams) — no invitations and no sign-in card. Like SSO, it's an Enterprise-plan feature. In a multi-org group, child organizations configure their own mappings rather than inheriting the parent's.
A mapping has three parts:
1. **Email domain** — the company domain to claim (for example `acme.com`). Public email providers such as `gmail.com` are rejected. The same domain may be claimed by more than one organization, as long as each claims a different Slack workspace or Teams tenant — it's the pairing of domain and workspace that must be unique.
2. **Microsoft Teams tenant IDs** — the Azure AD tenant(s) whose Teams messages may trigger auto-onboarding. Find your tenant ID in the [Microsoft Entra admin center](https://entra.microsoft.com) under **Identity → Overview** (it's a GUID).
3. **Slack workspace IDs** — the Slack workspace(s) whose messages may trigger auto-onboarding. Open Slack in a web browser: the workspace ID is the segment starting with `T` in the URL (`app.slack.com/client/T0123ABCD/…`).
At least one Teams tenant ID or Slack workspace ID is required, and channel-triggered onboarding only ever fires for messages that come from one of those pinned tenants or workspaces — a matching email address messaging from anywhere else is ignored. Comma-separate multiple IDs. Separately, someone who **signs up on the Pinkfish web app** with a verified email on the mapped domain also joins the organization automatically (web signup itself requires an invitation; the pinned IDs apply only to channel messages, where the email is asserted by the platform rather than verified by sign-up).
Once a mapping is active:
* **New teammates** who message the bot from a pinned tenant or workspace get a Pinkfish account created automatically and join the organization as **members** (not builders). Their message routes straight to an agent. Admins can promote individual users from the [Users](#users) page later, and anyone the admin has removed stays removed — auto-onboarding never overrides a role change or removal.
* **Existing Pinkfish users** on the domain are added as members automatically — a background sweep runs when the mapping is created (it retries itself if interrupted), and anyone it misses is added on their next message from a pinned tenant or workspace.
* Auto-onboarded users don't get a personal "My Organization" — they belong to the mapped organization only, mirroring how SSO-provisioned users work. They can later sign in on the web with the same email (use **Forgot password** to set one) and land in the same account.
Mappings are listed under the form with their pinned IDs; remove one with the **×** button (a confirmation dialog guards against accidents). Removing a mapping stops future auto-onboarding but doesn't remove anyone who already joined.
Non-enterprise organizations see an **Enterprise Feature** notice, and non-admins see a permission notice.
## Models
The **Models** page is where you configure Bring Your Own Model (BYOM) — connecting your own Anthropic or OpenAI account so your organization's agents, workflows, and Coworker sessions run on your models (and bill tokens to your provider, not your Pinkfish credits).
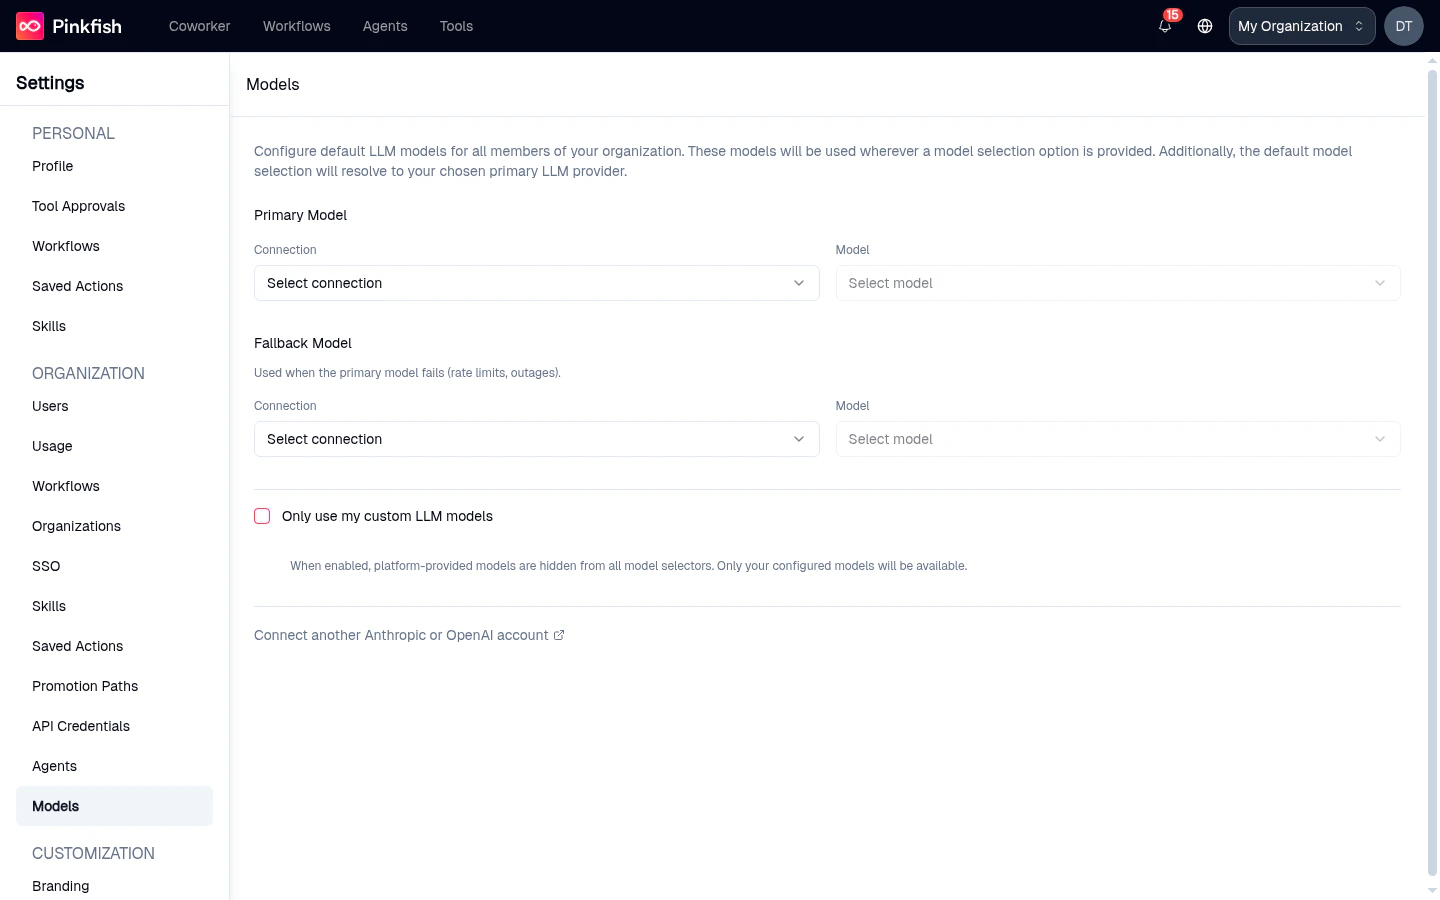 Quick reference:
* **Primary Model** — the default model for the whole organization
* **Fallback Model** — used automatically when the primary fails
* **Only use my custom LLM models** — hide Pinkfish's platform models so members pick exclusively from yours
* **Offer same models to sub-organizations** — propagate your configuration down the hierarchy
See [Bring Your Own Model (BYOM)](/organization/byom) for the full setup walkthrough, supported providers, failover behavior, and caveats.
## Who Can See What
| Section | Members | Admins | Enterprise |
| -------------------------- | -------------- | --------------------------- | --------------------------- |
| Users | Read-only list | Invite / edit / remove | — |
| Usage | View | View | View |
| Workflows (org) | — | Configure | Configure |
| Billing | View | Manage | Hidden (managed separately) |
| Organizations | View own | Edit | Create sub-orgs |
| SSO | — | Configure (parent org only) | Required plan |
| Skills (org) | View | Create / edit / delete | Create / edit / delete |
| Saved Actions (org) | — | Configure | Configure |
| Promotion Paths | — | Create / delete | Create / delete |
| API Credentials | — | — | Create / delete |
| Channels — availability | View | Configure | Configure |
| Channels — auto-onboarding | — | Configure | Required plan |
| Models | — | Configure | Configure |
Quick reference:
* **Primary Model** — the default model for the whole organization
* **Fallback Model** — used automatically when the primary fails
* **Only use my custom LLM models** — hide Pinkfish's platform models so members pick exclusively from yours
* **Offer same models to sub-organizations** — propagate your configuration down the hierarchy
See [Bring Your Own Model (BYOM)](/organization/byom) for the full setup walkthrough, supported providers, failover behavior, and caveats.
## Who Can See What
| Section | Members | Admins | Enterprise |
| -------------------------- | -------------- | --------------------------- | --------------------------- |
| Users | Read-only list | Invite / edit / remove | — |
| Usage | View | View | View |
| Workflows (org) | — | Configure | Configure |
| Billing | View | Manage | Hidden (managed separately) |
| Organizations | View own | Edit | Create sub-orgs |
| SSO | — | Configure (parent org only) | Required plan |
| Skills (org) | View | Create / edit / delete | Create / edit / delete |
| Saved Actions (org) | — | Configure | Configure |
| Promotion Paths | — | Create / delete | Create / delete |
| API Credentials | — | — | Create / delete |
| Channels — availability | View | Configure | Configure |
| Channels — auto-onboarding | — | Configure | Required plan |
| Models | — | Configure | Configure |