> ## Documentation Index
> Fetch the complete documentation index at: https://docs.pinkfish.ai/llms.txt
> Use this file to discover all available pages before exploring further.
# Agent Builder
> Anatomy of the builder — full-width tab bar at the top, editor panel on the left, live preview on the right
The **Agent Builder** is where you configure every aspect of an agent. You open it by clicking an agent in the [My Agents list](/agents/my-agents) or by clicking **Create new agent** (which goes to `/agents/builder/new`).
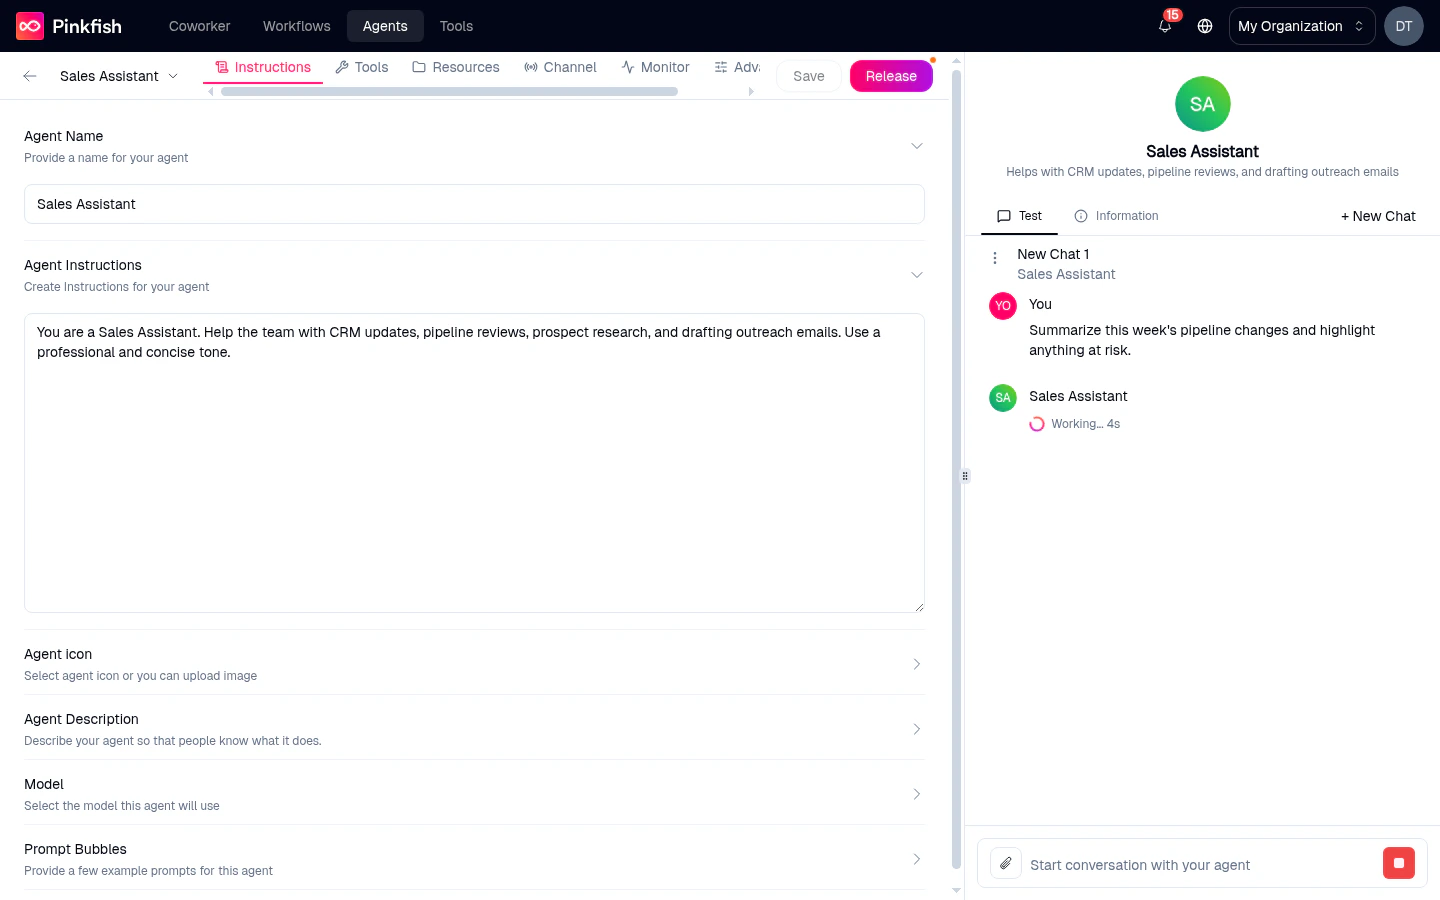 The builder is a three-part layout:
1. **Top bar** — a full-width header spanning both panes: back arrow, agent name (with quick actions), tab strip, **Builder** toggle, **Save** and **Release** buttons.
2. **Editor panel** (left) — the configuration surface for the active tab. You can have up to six tabs pinned at once.
3. **Preview pane** (right) — a live chat against your draft, or an Information view of the agent's current config.
## The top bar
From left to right:
* **← Back arrow** — returns you to `/agents`.
* **Agent name** — click the chevron next to the name to open a small menu with **Tag**, **Share**, and **Delete** actions. Edit the name itself from the **Instructions** tab.
The builder is a three-part layout:
1. **Top bar** — a full-width header spanning both panes: back arrow, agent name (with quick actions), tab strip, **Builder** toggle, **Save** and **Release** buttons.
2. **Editor panel** (left) — the configuration surface for the active tab. You can have up to six tabs pinned at once.
3. **Preview pane** (right) — a live chat against your draft, or an Information view of the agent's current config.
## The top bar
From left to right:
* **← Back arrow** — returns you to `/agents`.
* **Agent name** — click the chevron next to the name to open a small menu with **Tag**, **Share**, and **Delete** actions. Edit the name itself from the **Instructions** tab.
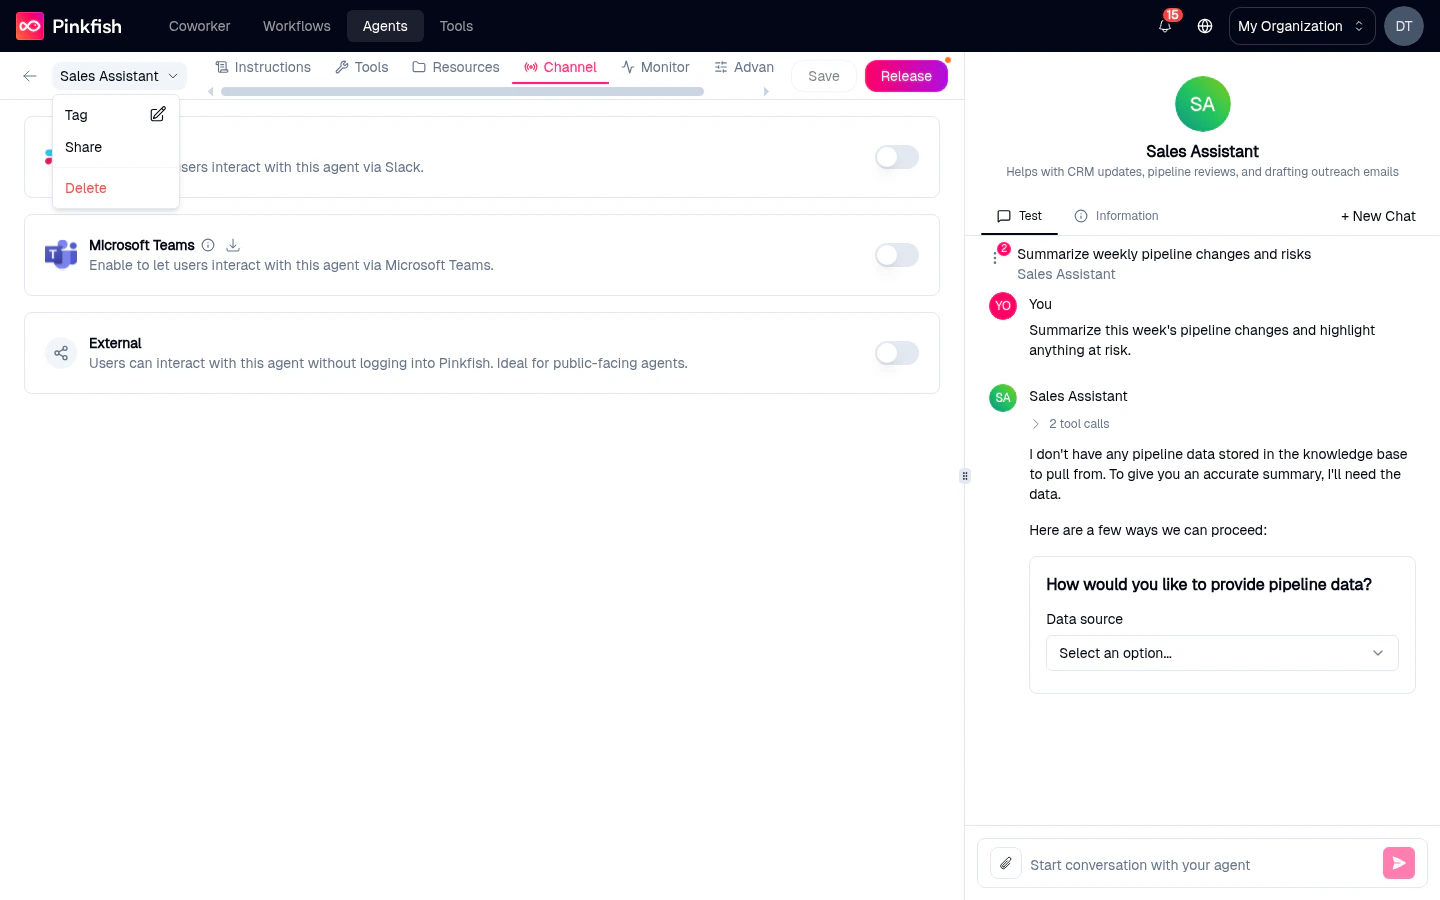 * **Tabs** — a horizontal strip of the sections you've pinned. See below.
* **Builder** *(only on agents you can edit)* — toggles the **Agent Builder** chat panel open alongside the editor. Use it to describe changes in natural language and let the AI apply them for you.
* **Save** — writes the current form values as a new draft version. Disabled when nothing has changed and on brand-new agents until required fields are filled.
* **Release** — opens the Publish dropdown. See [Save & Release](/agents/releases).
Some buttons fire **"Please save the agent before \[action]"** toasts when you try to Tag, Share, or Delete a brand-new agent that hasn't been saved yet.
## The six tabs
* **Tabs** — a horizontal strip of the sections you've pinned. See below.
* **Builder** *(only on agents you can edit)* — toggles the **Agent Builder** chat panel open alongside the editor. Use it to describe changes in natural language and let the AI apply them for you.
* **Save** — writes the current form values as a new draft version. Disabled when nothing has changed and on brand-new agents until required fields are filled.
* **Release** — opens the Publish dropdown. See [Save & Release](/agents/releases).
Some buttons fire **"Please save the agent before \[action]"** toasts when you try to Tag, Share, or Delete a brand-new agent that hasn't been saved yet.
## The six tabs
 Every agent has up to six configuration tabs, listed here in their canonical order:
Name, icon, description, system prompt, model, prompt bubbles. **Always pinned** — you can't remove it.
MCP connections, embedded services, agents-as-tools, workflows-as-tools.
Datastores, filestores, knowledge bases with Read / Write / Admin permissions.
Slack, Microsoft Teams, Email, API, A2A.
Replay this agent's chats from inside the builder.
Output Schema — structured JSON responses for API callers.
### Pinning tabs
Only **Instructions** and **Tools** are pinned by default. Click the **+** at the end of the tab strip to pin **Resources**, **Channels**, **Monitor**, or **Advanced**. Pinned tabs persist across sessions.
If a tab has validation errors, its label turns red.
The **Channels** and **Advanced** tabs are hidden for Pinkfish's built-in system agents.
## The preview pane
The right side of the builder is a live sandbox against your current draft. It has two tabs:
### Test
The default view — a chat interface connected to the draft you're editing. Type a message, watch the agent respond with the current instructions, model, and tools. This is where you validate changes before releasing.
Every agent has up to six configuration tabs, listed here in their canonical order:
Name, icon, description, system prompt, model, prompt bubbles. **Always pinned** — you can't remove it.
MCP connections, embedded services, agents-as-tools, workflows-as-tools.
Datastores, filestores, knowledge bases with Read / Write / Admin permissions.
Slack, Microsoft Teams, Email, API, A2A.
Replay this agent's chats from inside the builder.
Output Schema — structured JSON responses for API callers.
### Pinning tabs
Only **Instructions** and **Tools** are pinned by default. Click the **+** at the end of the tab strip to pin **Resources**, **Channels**, **Monitor**, or **Advanced**. Pinned tabs persist across sessions.
If a tab has validation errors, its label turns red.
The **Channels** and **Advanced** tabs are hidden for Pinkfish's built-in system agents.
## The preview pane
The right side of the builder is a live sandbox against your current draft. It has two tabs:
### Test
The default view — a chat interface connected to the draft you're editing. Type a message, watch the agent respond with the current instructions, model, and tools. This is where you validate changes before releasing.
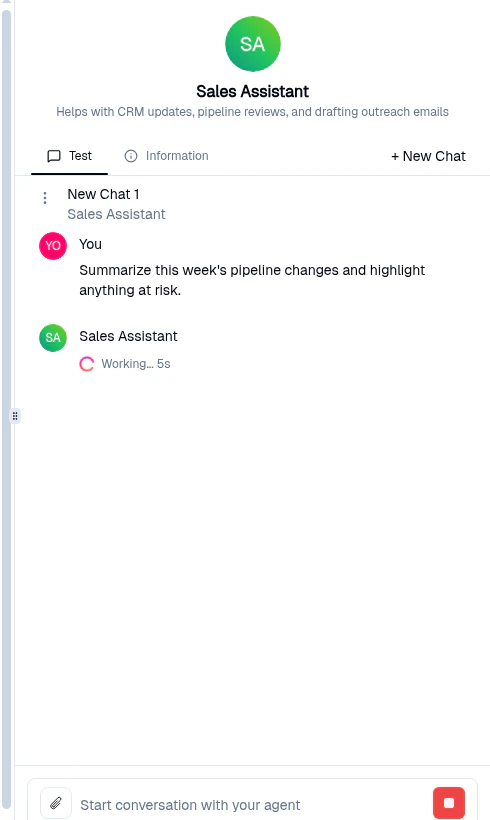 For brand-new agents you'll see:
> *"Save the agent first, then start a conversation to test it here."*
Click **+ New Chat** to clear the preview and start fresh — useful when you've changed instructions and want to see behavior from a clean starting point.
### Information
The **Information** tab is a read-only summary of what the agent will actually do when invoked.
For brand-new agents you'll see:
> *"Save the agent first, then start a conversation to test it here."*
Click **+ New Chat** to clear the preview and start fresh — useful when you've changed instructions and want to see behavior from a clean starting point.
### Information
The **Information** tab is a read-only summary of what the agent will actually do when invoked.
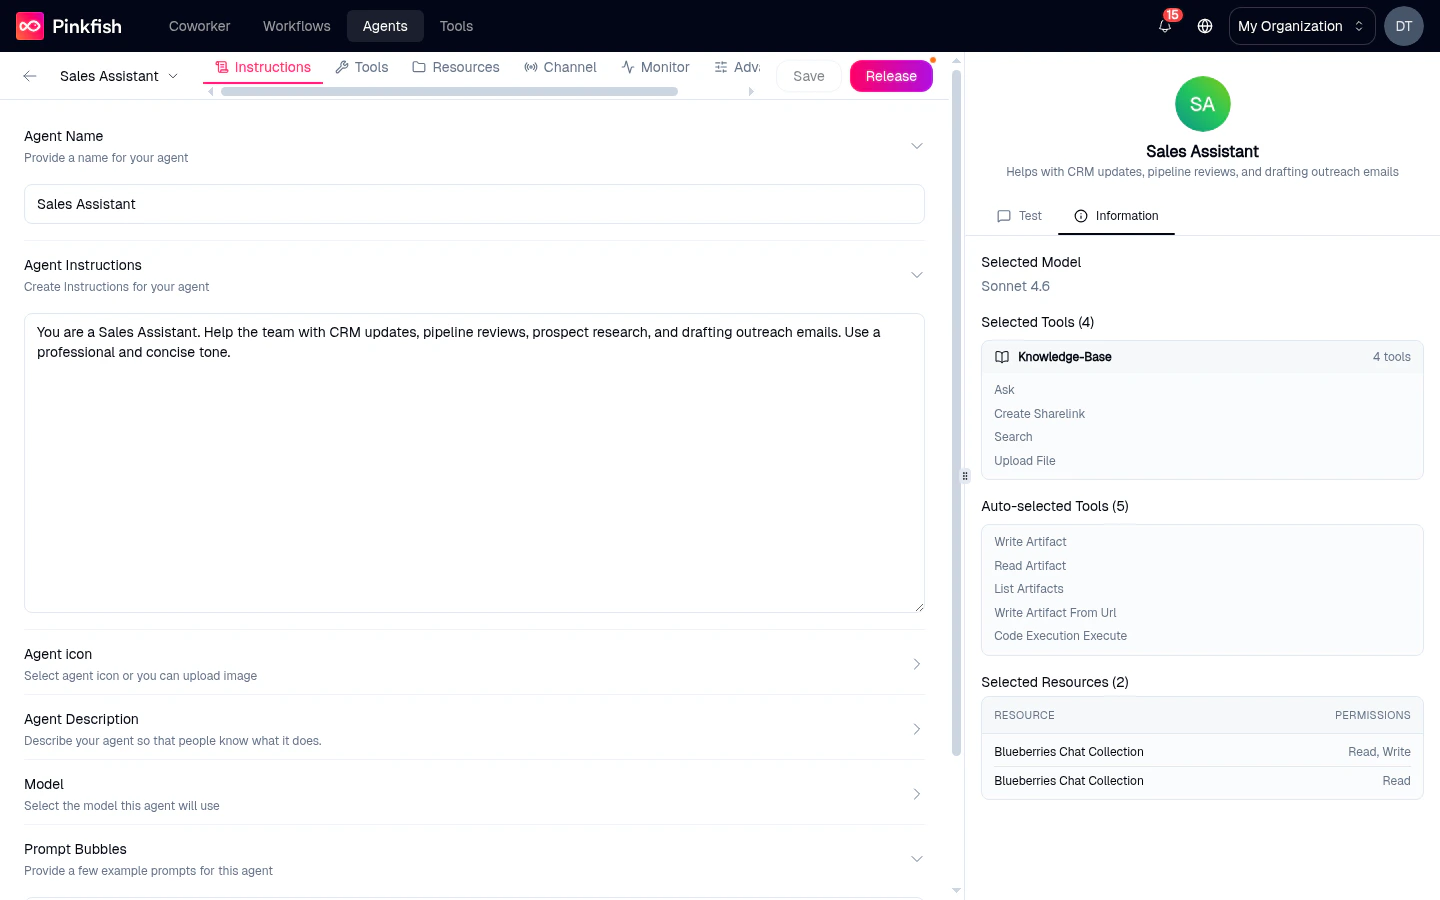 It shows:
* **Selected Model** — the model label (e.g. `Sonnet 4.5`).
* **Selected Tools (N)** — tools you picked, grouped by server. Shows `All X tools` when you've selected a server wholesale, or the exact tool names when you picked a subset. Expand rows with more than five tools via **+N more**.
* **Auto-selected Tools** — built-in tools that every agent gets automatically (e.g. Write Artifact, Read Artifact, Run Code). These can't be turned off.
* **Selected Resources (N)** — attached datastores/filestores/KBs with a Read / Write / Admin summary.
The Information view is especially handy when debugging — if the agent isn't using a tool you expected, this pane tells you whether it's in scope.
## The full workflow
Click a row in [My Agents](/agents/my-agents), or click **Create new agent** to land on `/agents/builder/new`.
Name, instructions, icon, description, model. These are the minimum to save.
Click **Save** to persist a draft. You can test it in the Preview pane now.
Click **+** to add Resources, Channels, Monitor, or Advanced. Configure each.
Chat with the draft. Check the **Information** tab to confirm model, tools, and resources look right.
Open the **Release** dropdown and publish. The released version becomes available in Coworker and on enabled channels.
## Related
* [Save & Release](/agents/releases) — what Save vs Release actually does.
* [Instructions](/agents/instructions) — the first tab in detail.
* [Monitor](/agents/monitor) — the in-builder monitor, not the org-wide one.
It shows:
* **Selected Model** — the model label (e.g. `Sonnet 4.5`).
* **Selected Tools (N)** — tools you picked, grouped by server. Shows `All X tools` when you've selected a server wholesale, or the exact tool names when you picked a subset. Expand rows with more than five tools via **+N more**.
* **Auto-selected Tools** — built-in tools that every agent gets automatically (e.g. Write Artifact, Read Artifact, Run Code). These can't be turned off.
* **Selected Resources (N)** — attached datastores/filestores/KBs with a Read / Write / Admin summary.
The Information view is especially handy when debugging — if the agent isn't using a tool you expected, this pane tells you whether it's in scope.
## The full workflow
Click a row in [My Agents](/agents/my-agents), or click **Create new agent** to land on `/agents/builder/new`.
Name, instructions, icon, description, model. These are the minimum to save.
Click **Save** to persist a draft. You can test it in the Preview pane now.
Click **+** to add Resources, Channels, Monitor, or Advanced. Configure each.
Chat with the draft. Check the **Information** tab to confirm model, tools, and resources look right.
Open the **Release** dropdown and publish. The released version becomes available in Coworker and on enabled channels.
## Related
* [Save & Release](/agents/releases) — what Save vs Release actually does.
* [Instructions](/agents/instructions) — the first tab in detail.
* [Monitor](/agents/monitor) — the in-builder monitor, not the org-wide one.