> ## Documentation Index
> Fetch the complete documentation index at: https://docs.pinkfish.ai/llms.txt
> Use this file to discover all available pages before exploring further.
# Running a Workflow
> Execute your workflow from the editor — with inputs, stop control, batch variations, and auto-heal on failure.
Once you have nodes on the canvas, you'll want to run them. Agent Mode gives you several ways to kick off an execution — the Run button, a trigger invocation, a simulated API call, or a batch of variations — each with live feedback on the canvas and in the Log tab.
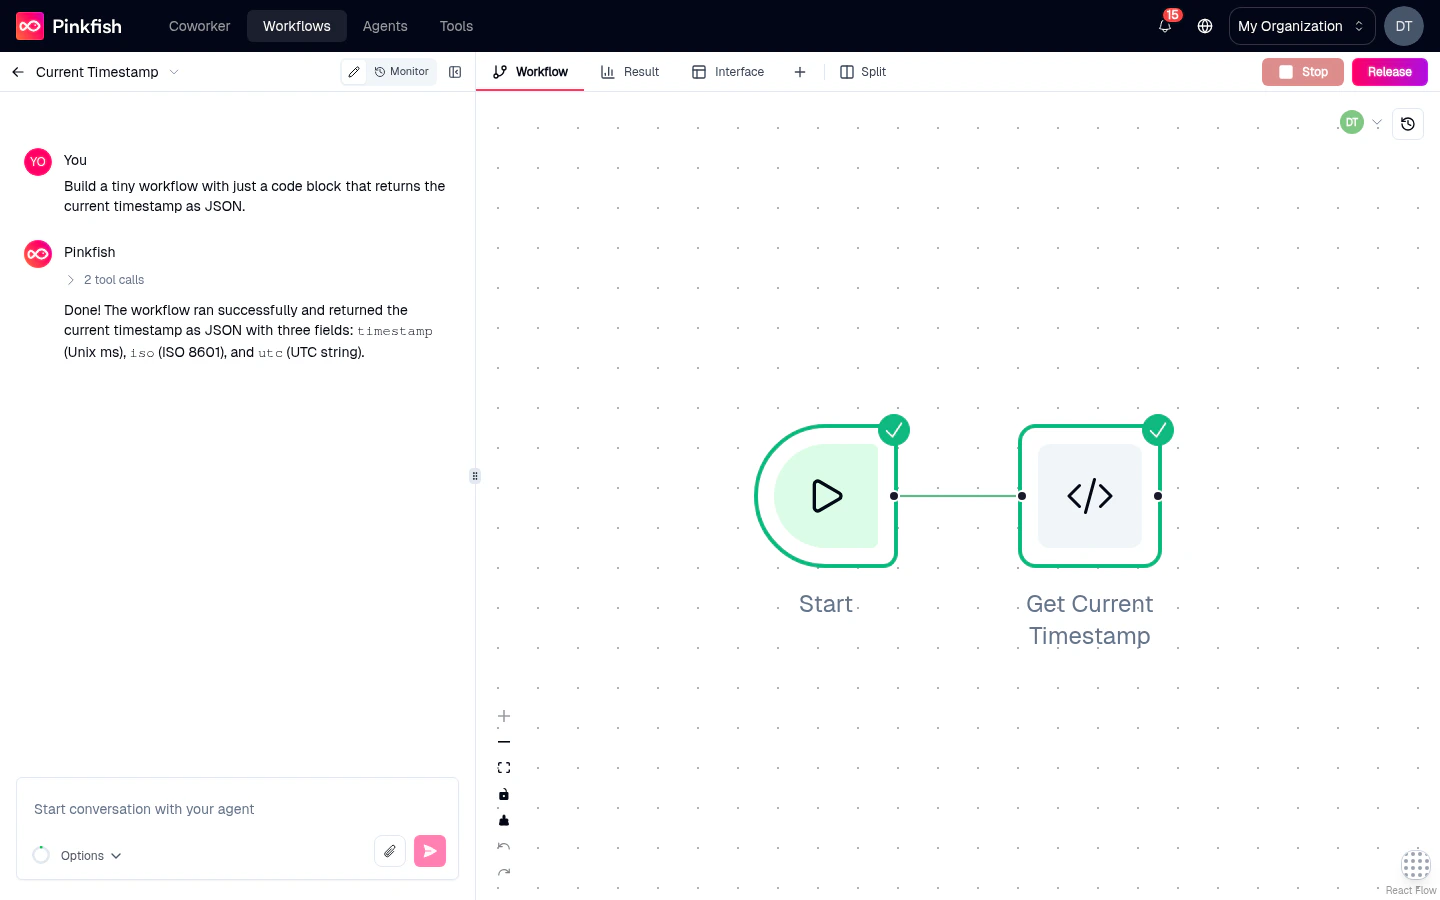 ## The Run Workflow button
The green **Run Workflow** button sits in the tab bar at the top-right of the editor. Clicking it:
1. Resolves which trigger to use (the selected trigger node, or the Manual trigger by default).
2. If the trigger has an input schema, opens an **Input Dialog** to collect values.
3. Fires the workflow and streams status back to the canvas and Log tab.
While the workflow runs, the button transforms into a **Stop** button (square icon). Click it to cancel the run — in-flight tool calls finish, but no further nodes execute.
## The Input Dialog
When the selected trigger has fields (an input schema), clicking **Run Workflow** opens a dialog pre-populated with their types. Fill in your test values and click **Run** to fire.
You can reopen the dialog without re-running via the **Show Inputs** button that appears next to Run on the canvas when inputs are present — handy for editing values and re-running with tweaks.
## Calling an API trigger
For API triggers, open the **Call API Trigger** modal (accessible from the trigger's context menu or via the run control). It generates a ready-to-send `curl` command with:
* The trigger's draft or live URL.
* The correct auth header.
* A pretty-printed JSON body editor.
You can execute the curl in a terminal, or click **Send** inside the modal to fire it from the editor directly.
## Running from the canvas
Right-click a node and choose:
* **Run entire workflow** (on a trigger) — fires the full workflow from that trigger.
* **Run until this node** (on a non-trigger) — runs the workflow from its trigger up to and including the right-clicked node, then stops. Invaluable for iterating on a specific step.
## Triggered runs
When an external event (an API call, an email, a schedule, an app trigger) fires the workflow while the editor is open, Pinkfish shows a **Triggered Run Notice** — a small toast/badge in the header. Click it to open the triggered run in the editor and watch its state live.
The **Triggered Runs** button next to the Run button shows a popover of recent triggered executions, so you can jump to any of them without switching to the full [Monitor](/agentic-editor/monitor) view.
## Live execution feedback
As the workflow runs, you'll see feedback in multiple places:
* **Canvas** — each node lights up with its status: pending → running → success/error/skipped. See [Canvas: Node status indicators](/agentic-editor/canvas#node-status-indicators).
* **Log tab** — streaming log entries from every node (tool calls, code block stdout, errors).
* **Result tab** — the selected node's output updates as soon as that node completes.
* **Runtime error banner** — if the workflow fails, a banner appears at the top of the canvas linking to the failing node.
## Batch runs
Need to run the workflow with a bunch of different inputs at once? Open the **Batch Options** modal from the chat input's batch icon. Configure:
* **Parameter set** — a CSV-like table of inputs, one row per run.
* **Concurrency** — how many runs execute in parallel.
* **Fail-fast** — stop the batch as soon as one run fails (vs. continue).
Click **Run** to kick off the batch. Each row becomes a separate run in the Monitor tab, all tagged with a shared batch ID so you can review them together.
## Mock vs. live execution
By default, every node hits the real world — real API calls, real files written, real emails sent. For safer iteration, toggle specific nodes into **Mock mode** to return synthetic data instead. See [Mock mode & pinning](/agentic-editor/mock-mode-and-pinning) for the full feature, including the release-gate caveat.
## Auto-heal
When a node fails, the coding agent can often propose a fix automatically. Pinkfish surfaces an **Auto-heal** suggestion on failed runs — click it and the agent revises the offending node's configuration or code and reruns from that point. Useful for flaky tool calls, schema mismatches, and similar self-correctable errors.
## Test data warning
Before you [release](/agentic-editor/releases) the workflow, Pinkfish may prompt you with a **Test Data Warning Dialog** if it detects you've only run with test inputs. The warning is a gentle nudge to validate against realistic data before promoting to live.
## Browser sessions during runs
If your workflow uses browser automation, you'll see a live browser view embedded in the Browser Session panel of the chat. The agent's clicks and typing stream in real-time so you can debug selector issues without re-running. See [Browser Logins](/tools/browser-login) for managing browser connections.
## What's next
Iterate faster by mocking expensive nodes and pinning outputs.
Review past runs, debug errors, and inspect execution traces.
Promote a successful live run into a versioned release.
Configure the triggers you're calling.
## The Run Workflow button
The green **Run Workflow** button sits in the tab bar at the top-right of the editor. Clicking it:
1. Resolves which trigger to use (the selected trigger node, or the Manual trigger by default).
2. If the trigger has an input schema, opens an **Input Dialog** to collect values.
3. Fires the workflow and streams status back to the canvas and Log tab.
While the workflow runs, the button transforms into a **Stop** button (square icon). Click it to cancel the run — in-flight tool calls finish, but no further nodes execute.
## The Input Dialog
When the selected trigger has fields (an input schema), clicking **Run Workflow** opens a dialog pre-populated with their types. Fill in your test values and click **Run** to fire.
You can reopen the dialog without re-running via the **Show Inputs** button that appears next to Run on the canvas when inputs are present — handy for editing values and re-running with tweaks.
## Calling an API trigger
For API triggers, open the **Call API Trigger** modal (accessible from the trigger's context menu or via the run control). It generates a ready-to-send `curl` command with:
* The trigger's draft or live URL.
* The correct auth header.
* A pretty-printed JSON body editor.
You can execute the curl in a terminal, or click **Send** inside the modal to fire it from the editor directly.
## Running from the canvas
Right-click a node and choose:
* **Run entire workflow** (on a trigger) — fires the full workflow from that trigger.
* **Run until this node** (on a non-trigger) — runs the workflow from its trigger up to and including the right-clicked node, then stops. Invaluable for iterating on a specific step.
## Triggered runs
When an external event (an API call, an email, a schedule, an app trigger) fires the workflow while the editor is open, Pinkfish shows a **Triggered Run Notice** — a small toast/badge in the header. Click it to open the triggered run in the editor and watch its state live.
The **Triggered Runs** button next to the Run button shows a popover of recent triggered executions, so you can jump to any of them without switching to the full [Monitor](/agentic-editor/monitor) view.
## Live execution feedback
As the workflow runs, you'll see feedback in multiple places:
* **Canvas** — each node lights up with its status: pending → running → success/error/skipped. See [Canvas: Node status indicators](/agentic-editor/canvas#node-status-indicators).
* **Log tab** — streaming log entries from every node (tool calls, code block stdout, errors).
* **Result tab** — the selected node's output updates as soon as that node completes.
* **Runtime error banner** — if the workflow fails, a banner appears at the top of the canvas linking to the failing node.
## Batch runs
Need to run the workflow with a bunch of different inputs at once? Open the **Batch Options** modal from the chat input's batch icon. Configure:
* **Parameter set** — a CSV-like table of inputs, one row per run.
* **Concurrency** — how many runs execute in parallel.
* **Fail-fast** — stop the batch as soon as one run fails (vs. continue).
Click **Run** to kick off the batch. Each row becomes a separate run in the Monitor tab, all tagged with a shared batch ID so you can review them together.
## Mock vs. live execution
By default, every node hits the real world — real API calls, real files written, real emails sent. For safer iteration, toggle specific nodes into **Mock mode** to return synthetic data instead. See [Mock mode & pinning](/agentic-editor/mock-mode-and-pinning) for the full feature, including the release-gate caveat.
## Auto-heal
When a node fails, the coding agent can often propose a fix automatically. Pinkfish surfaces an **Auto-heal** suggestion on failed runs — click it and the agent revises the offending node's configuration or code and reruns from that point. Useful for flaky tool calls, schema mismatches, and similar self-correctable errors.
## Test data warning
Before you [release](/agentic-editor/releases) the workflow, Pinkfish may prompt you with a **Test Data Warning Dialog** if it detects you've only run with test inputs. The warning is a gentle nudge to validate against realistic data before promoting to live.
## Browser sessions during runs
If your workflow uses browser automation, you'll see a live browser view embedded in the Browser Session panel of the chat. The agent's clicks and typing stream in real-time so you can debug selector issues without re-running. See [Browser Logins](/tools/browser-login) for managing browser connections.
## What's next
Iterate faster by mocking expensive nodes and pinning outputs.
Review past runs, debug errors, and inspect execution traces.
Promote a successful live run into a versioned release.
Configure the triggers you're calling.