> ## Documentation Index
> Fetch the complete documentation index at: https://docs.pinkfish.ai/llms.txt
> Use this file to discover all available pages before exploring further.
# Node Types
> The complete catalog of nodes you can place on a Agent Mode canvas — executable, control-flow, and special nodes.
Every workflow is built out of nodes. This reference walks through every node type the editor exposes, what it does, where its settings live, and how it wires up.
For the UI of **adding** a node, see [Adding Nodes](/agentic-editor/adding-nodes). For the **canvas mechanics**, see [Canvas](/agentic-editor/canvas).
## Executable nodes
These nodes actually run — they call tools, execute code, or delegate to other agents.
### MCP Tool Call
The workhorse of Agent Mode. An MCP tool node invokes a single tool exposed by one of Pinkfish's MCP servers — anything from `slack.sendMessage` to `gmail.search` to `anthropic.createMessage`. The catalog is large and growing; see [Embedded MCP Servers](/api-reference/mcp-servers/embedded/overview) and [Application MCP Servers](/api-reference/mcp-servers/application/overview) for the full list.
**Settings:**
* **Connection** — for third-party apps, pick which of your connections to authenticate with.
* **Arguments** — a dynamic form generated from the tool's JSON schema. Fields accept literal values, `{{mentions}}` of previous-node outputs, or a mix.
* **Retries** — toggle automatic retries with a dead-letter path.
* **Mock mode** — return synthetic data without calling the real tool. See [Mock mode & pinning](/agentic-editor/mock-mode-and-pinning).
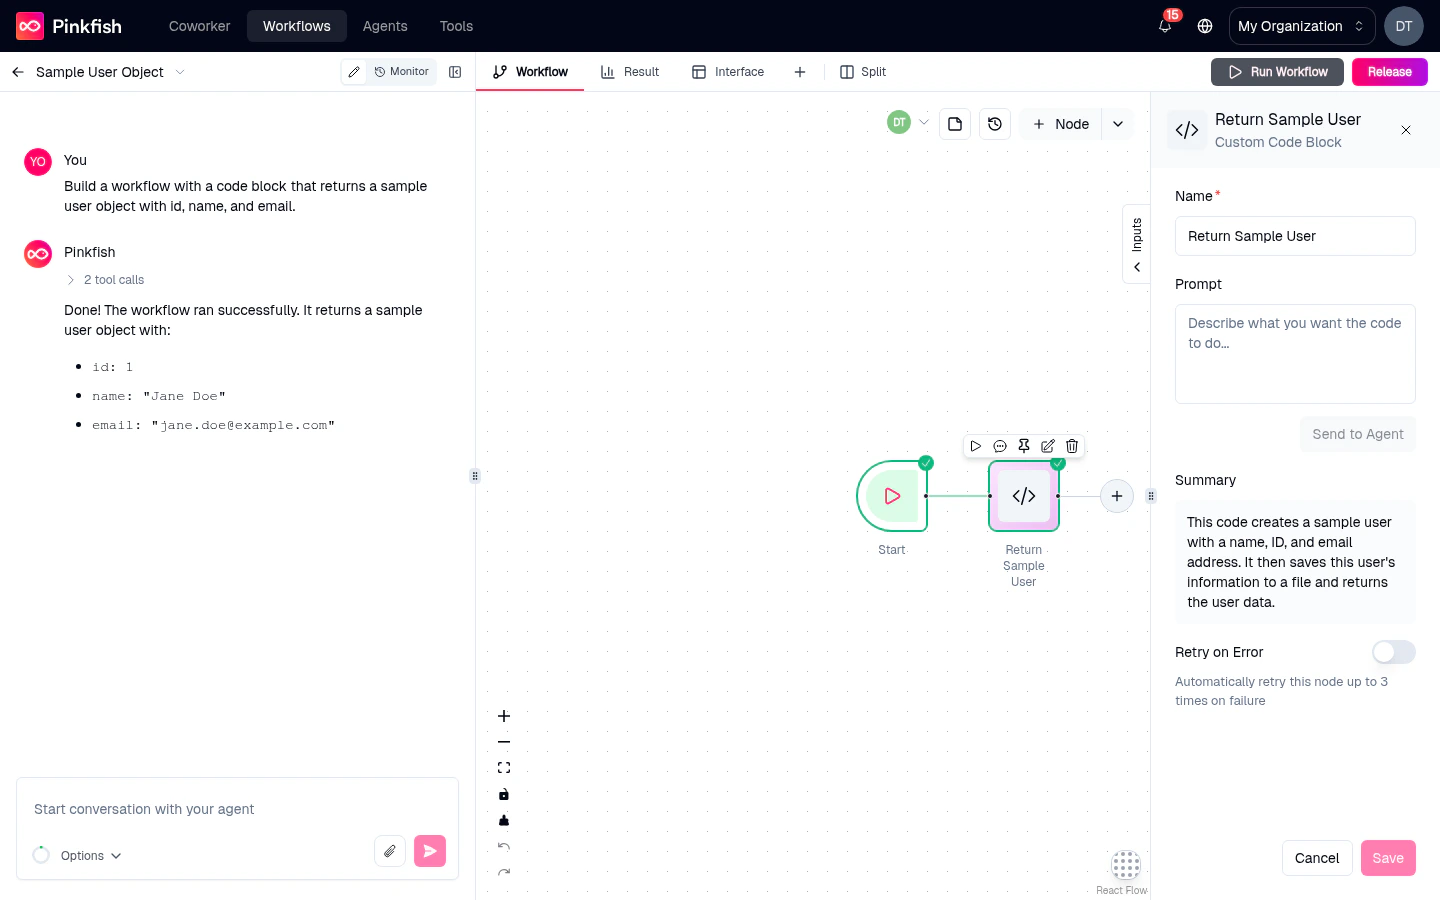
### Code Block
Add custom JavaScript code to your workflow. The node embeds a Monaco editor for the code body; inputs flow in as named variables based on the incoming edges, and whatever your code `return`s becomes the node's output.
**Settings:**
* **Code editor** — Monaco with JavaScript syntax highlighting.
* **Input schema** — optional typed inputs that get injected as variables.
* **Output schema** — declare the shape of your return value so downstream nodes can reference fields.
 ### Agent
Call another Pinkfish agent from inside your workflow. Useful for delegating a specialized task — "ask the Research Agent to summarize this URL and come back with the answer" — without duplicating its instructions and tools.
**Settings:**
* **Agent** — picker of agents you have access to.
* **Release** — pin to a specific release of the agent, or track the latest.
* **Prompt** — the message to send, typically with mentions of upstream outputs.
### Workflow (Sub-workflow)
Call another workflow as a function. Inputs mapped in; outputs come back. Composes complex pipelines out of reusable pieces.
**Settings:**
* **Workflow** — picker of workflows you have access to.
* **Release** — specific release, or draft.
* **Inputs** — one field per input declared by the sub-workflow's trigger.
### Custom Integration
A special kind of tool-call node for Pink-Connect integrations built in your workspace. Behaves like an MCP tool but points at your custom service. See [API Connections](/tools/connections) for how to author one.
### Legacy
You may encounter **Legacy** nodes in older workflows migrated from Guided Mode. They're read-only shims that preserve behavior but aren't authorable from the palette anymore. Ask the coding agent to replace them with modern equivalents.
## Control-flow nodes
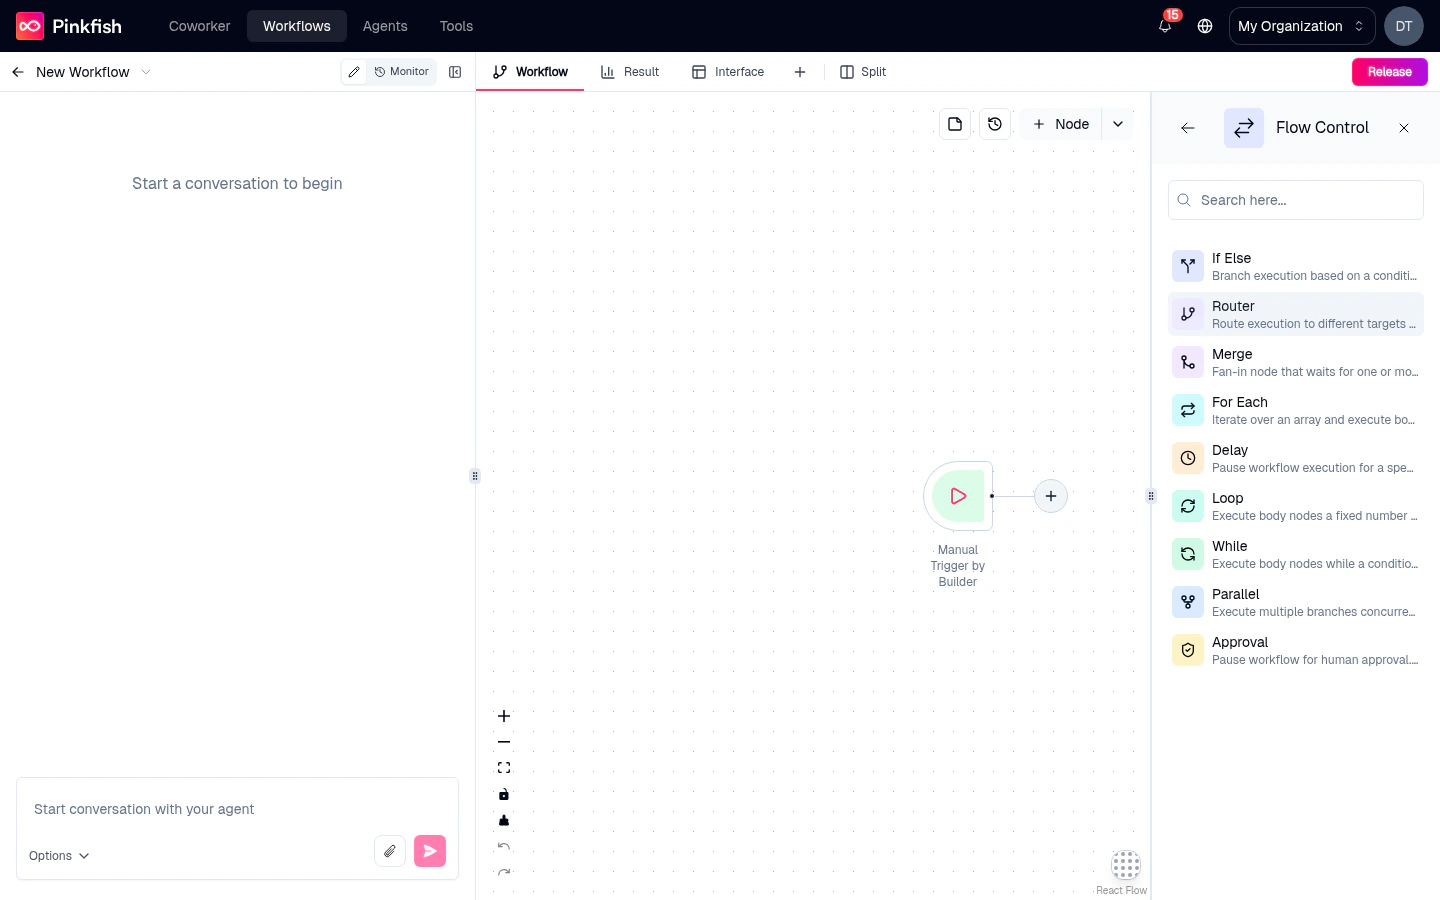
Flow-control nodes don't call tools — they shape execution. Add them from the **Flow Control** entry on the Nodes tab.
### If-Else
> Branch execution based on a condition. True path continues, false path can skip, stop, or goto another node.
The core boolean branch. Configure:
* **Condition** — an expression built in the mention-based editor (`{{trigger.email.subject}} contains "invoice"`).
* **On true** — the node on the `true` branch continues.
* **On false** — skip downstream, stop the run, or goto another node.
### Router
> Route execution to different targets based on evaluating an expression.
Like If-Else with many branches. Define N routes, each with its own condition and destination. Conditions can be exact-match or regex (prefix with `regex_`).
### Merge
> Fan-in node that waits for one or more inputs before continuing.
Use Merge to bring multiple parallel branches back into a single path. Configure how many incoming edges must fire — all, any, or a specific count — before downstream nodes run.
### For Each
> Iterate over an array and execute body nodes for each item.
Pick an array from an upstream output; the nested "body" nodes run once per item. Outputs are collected into an array in the order items completed.
### Delay
> Pause workflow execution for a specified duration in milliseconds.
A simple wait. Configure the duration. Typically used for polling loops or rate-limit backoff.
### Loop
> Execute body nodes a fixed number of times.
Runs the body N times unconditionally. Each iteration sees the loop index; outputs accumulate.
### While
> Execute body nodes while a condition is true.
Runs the body repeatedly until the condition evaluates false. Be careful with termination — the editor enforces a max-iteration safeguard to prevent infinite loops.
### Parallel
> Execute multiple branches concurrently, wait for all.
Fan out into multiple independent branches that all run at the same time. Downstream execution waits until every branch finishes. Useful for independent API calls that don't depend on each other.
### Approval (Human-in-the-Loop)
> Pause workflow for human approval. Sends notification, waits for approve or deny.
Blocks the run until a human responds. Configure:
* **Preamble** — the message shown to the approver (up to 5,000 characters).
* **Expiration** — how long to wait before auto-denying (minimum 1 minute).
* **Notification channel** — Slack, Teams, email, or in-app.
See [Human in the Loop](/orchestration/human-in-the-loop) for the full approval experience, including how approvers interact with it.
### Agent
Call another Pinkfish agent from inside your workflow. Useful for delegating a specialized task — "ask the Research Agent to summarize this URL and come back with the answer" — without duplicating its instructions and tools.
**Settings:**
* **Agent** — picker of agents you have access to.
* **Release** — pin to a specific release of the agent, or track the latest.
* **Prompt** — the message to send, typically with mentions of upstream outputs.
### Workflow (Sub-workflow)
Call another workflow as a function. Inputs mapped in; outputs come back. Composes complex pipelines out of reusable pieces.
**Settings:**
* **Workflow** — picker of workflows you have access to.
* **Release** — specific release, or draft.
* **Inputs** — one field per input declared by the sub-workflow's trigger.
### Custom Integration
A special kind of tool-call node for Pink-Connect integrations built in your workspace. Behaves like an MCP tool but points at your custom service. See [API Connections](/tools/connections) for how to author one.
### Legacy
You may encounter **Legacy** nodes in older workflows migrated from Guided Mode. They're read-only shims that preserve behavior but aren't authorable from the palette anymore. Ask the coding agent to replace them with modern equivalents.
## Control-flow nodes
Flow-control nodes don't call tools — they shape execution. Add them from the **Flow Control** entry on the Nodes tab.
### If-Else
> Branch execution based on a condition. True path continues, false path can skip, stop, or goto another node.
The core boolean branch. Configure:
* **Condition** — an expression built in the mention-based editor (`{{trigger.email.subject}} contains "invoice"`).
* **On true** — the node on the `true` branch continues.
* **On false** — skip downstream, stop the run, or goto another node.
### Router
> Route execution to different targets based on evaluating an expression.
Like If-Else with many branches. Define N routes, each with its own condition and destination. Conditions can be exact-match or regex (prefix with `regex_`).
### Merge
> Fan-in node that waits for one or more inputs before continuing.
Use Merge to bring multiple parallel branches back into a single path. Configure how many incoming edges must fire — all, any, or a specific count — before downstream nodes run.
### For Each
> Iterate over an array and execute body nodes for each item.
Pick an array from an upstream output; the nested "body" nodes run once per item. Outputs are collected into an array in the order items completed.
### Delay
> Pause workflow execution for a specified duration in milliseconds.
A simple wait. Configure the duration. Typically used for polling loops or rate-limit backoff.
### Loop
> Execute body nodes a fixed number of times.
Runs the body N times unconditionally. Each iteration sees the loop index; outputs accumulate.
### While
> Execute body nodes while a condition is true.
Runs the body repeatedly until the condition evaluates false. Be careful with termination — the editor enforces a max-iteration safeguard to prevent infinite loops.
### Parallel
> Execute multiple branches concurrently, wait for all.
Fan out into multiple independent branches that all run at the same time. Downstream execution waits until every branch finishes. Useful for independent API calls that don't depend on each other.
### Approval (Human-in-the-Loop)
> Pause workflow for human approval. Sends notification, waits for approve or deny.
Blocks the run until a human responds. Configure:
* **Preamble** — the message shown to the approver (up to 5,000 characters).
* **Expiration** — how long to wait before auto-denying (minimum 1 minute).
* **Notification channel** — Slack, Teams, email, or in-app.
See [Human in the Loop](/orchestration/human-in-the-loop) for the full approval experience, including how approvers interact with it.
 ## Special nodes
These don't execute, but they live on the canvas.
### Trigger
Every workflow starts with at least one trigger node — the Manual trigger is always present, and you can add others (API, schedule, email, app triggers). See [Triggers](/agentic-editor/triggers).
### Interface
A special node that represents your workflow's user-facing form and result page. There can be only one. See [Interface builder](/agentic-editor/interface).
### Sticky Note
Non-executable annotations for documenting the canvas. Colored rectangles with free-form text. See [Sticky notes & canvas](/agentic-editor/sticky-notes-and-canvas).
## Node settings panel
Clicking any node (other than Trigger, Interface, and Sticky Note, which have their own experiences) opens a settings side-panel on the right. The panel has:
* A **header** with the node name (editable) and close button.
* A **Settings** tab with the node's configuration form.
* A **Retries** toggle (on applicable nodes).
* A **Mock** toggle (on applicable nodes — see [Mock mode](/agentic-editor/mock-mode-and-pinning)).
* A **Delete** action at the bottom.
Close the panel by clicking outside it, clicking the ✕, or pressing `Esc`.
## What's next
The palette UI for dropping these onto the canvas.
Every way a workflow can start.
The user-facing form and results view.
Execute what you've built.
## Special nodes
These don't execute, but they live on the canvas.
### Trigger
Every workflow starts with at least one trigger node — the Manual trigger is always present, and you can add others (API, schedule, email, app triggers). See [Triggers](/agentic-editor/triggers).
### Interface
A special node that represents your workflow's user-facing form and result page. There can be only one. See [Interface builder](/agentic-editor/interface).
### Sticky Note
Non-executable annotations for documenting the canvas. Colored rectangles with free-form text. See [Sticky notes & canvas](/agentic-editor/sticky-notes-and-canvas).
## Node settings panel
Clicking any node (other than Trigger, Interface, and Sticky Note, which have their own experiences) opens a settings side-panel on the right. The panel has:
* A **header** with the node name (editable) and close button.
* A **Settings** tab with the node's configuration form.
* A **Retries** toggle (on applicable nodes).
* A **Mock** toggle (on applicable nodes — see [Mock mode](/agentic-editor/mock-mode-and-pinning)).
* A **Delete** action at the bottom.
Close the panel by clicking outside it, clicking the ✕, or pressing `Esc`.
## What's next
The palette UI for dropping these onto the canvas.
Every way a workflow can start.
The user-facing form and results view.
Execute what you've built.