> ## Documentation Index
> Fetch the complete documentation index at: https://docs.pinkfish.ai/llms.txt
> Use this file to discover all available pages before exploring further.
# Adding Nodes
> Browse the node palette to add actions, triggers, and interfaces to your canvas — by category, by search, or by drilling into a specific app.
You can let the [coding agent](/agentic-editor/chat) build the workflow for you, but often you want to add a specific node yourself. The **Add Node panel** opens a browsable catalog of everything you can drop onto the canvas — tool calls, code blocks, triggers, flow-control nodes, and the interface form.
 ## Opening the panel
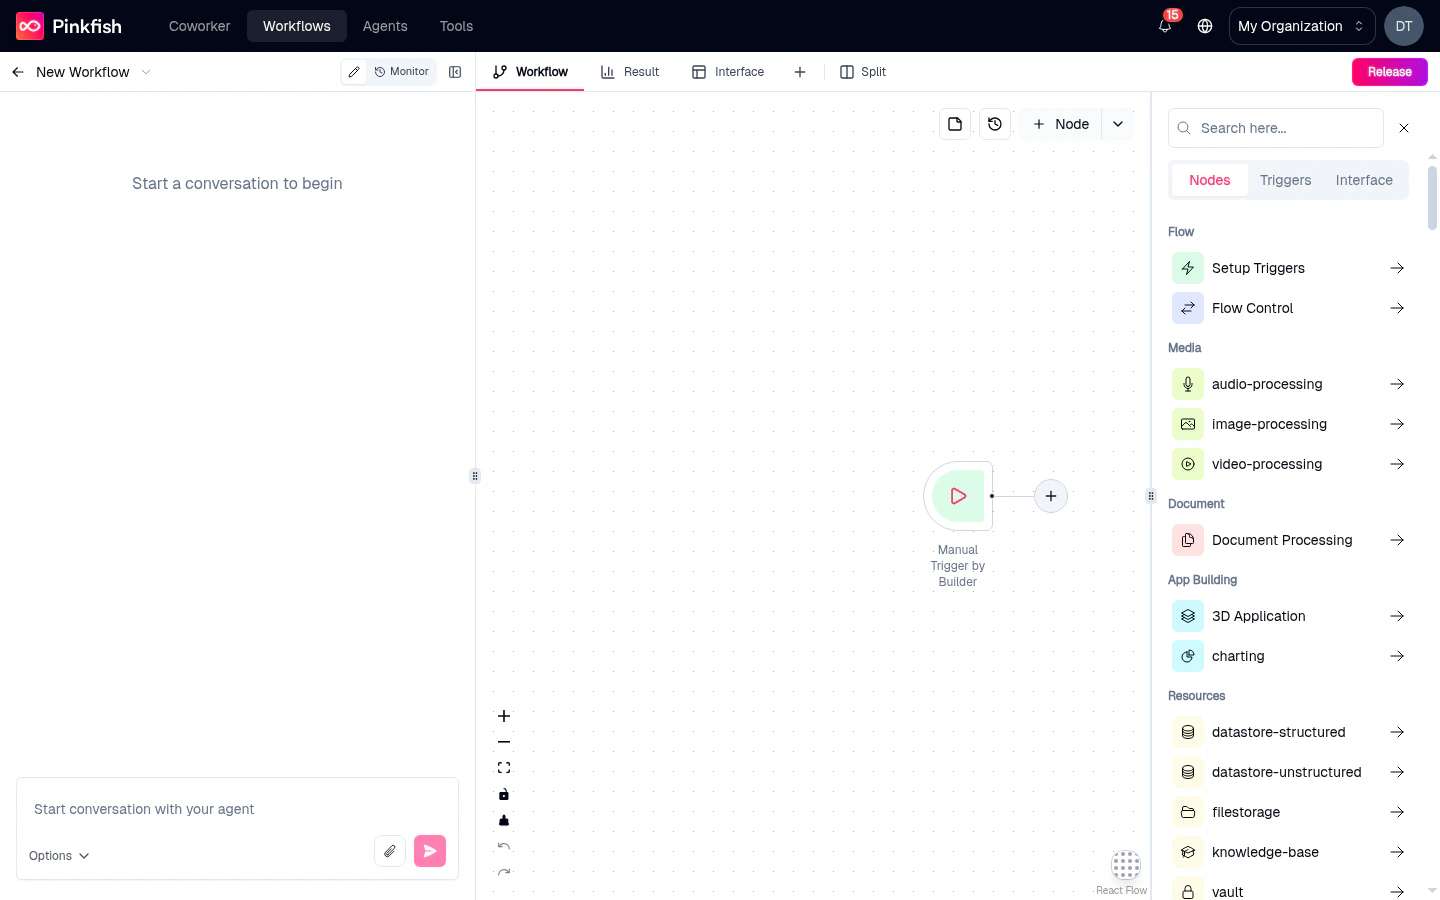
Click the **Add Node** button in the top-right of the editor header. A side-panel slides in from the right with three tabs: **Nodes**, **Triggers**, and **Interface**.
## The three tabs
Executable nodes — MCP tools, code blocks, agents, sub-workflows, flow-control.
Entry points — manual, API, schedule, email, app triggers, events.
The single user-facing form/results page for your workflow.
### Nodes tab
The **Nodes** tab (titled **Elements** inside the panel — "Elements are the building blocks of your workflow") presents a two-column grid of categories. Click a category to drill into its contents; click the back arrow in the header to pop up.
Top-level categories you'll see:
| Category | What's in it |
| ----------------------- | -------------------------------------------------------------- |
| **Media** | Audio, video, and image-processing MCPs |
| **Document** | PDF, Office, and general document tooling |
| **App Building** | Artifact and web-application tools |
| **Resources** | Vault, Filestore, Knowledge Base, Datastore |
| **Agents & Workflows** | Call another Pinkfish agent or sub-workflow |
| **Browser & Web** | Browser automation, scraping, HTTP utilities |
| **Embedded LLMs** | Direct LLM calls — Anthropic, OpenAI, Gemini, Groq, Perplexity |
| **Bring your own LLM** | Use your own LLM credentials |
| **Database** | Structured and unstructured datastore MCPs |
| **Others** | Email, weather, charting, miscellaneous tooling |
| **Custom Integrations** | Pink-Connect integrations you or your org built |
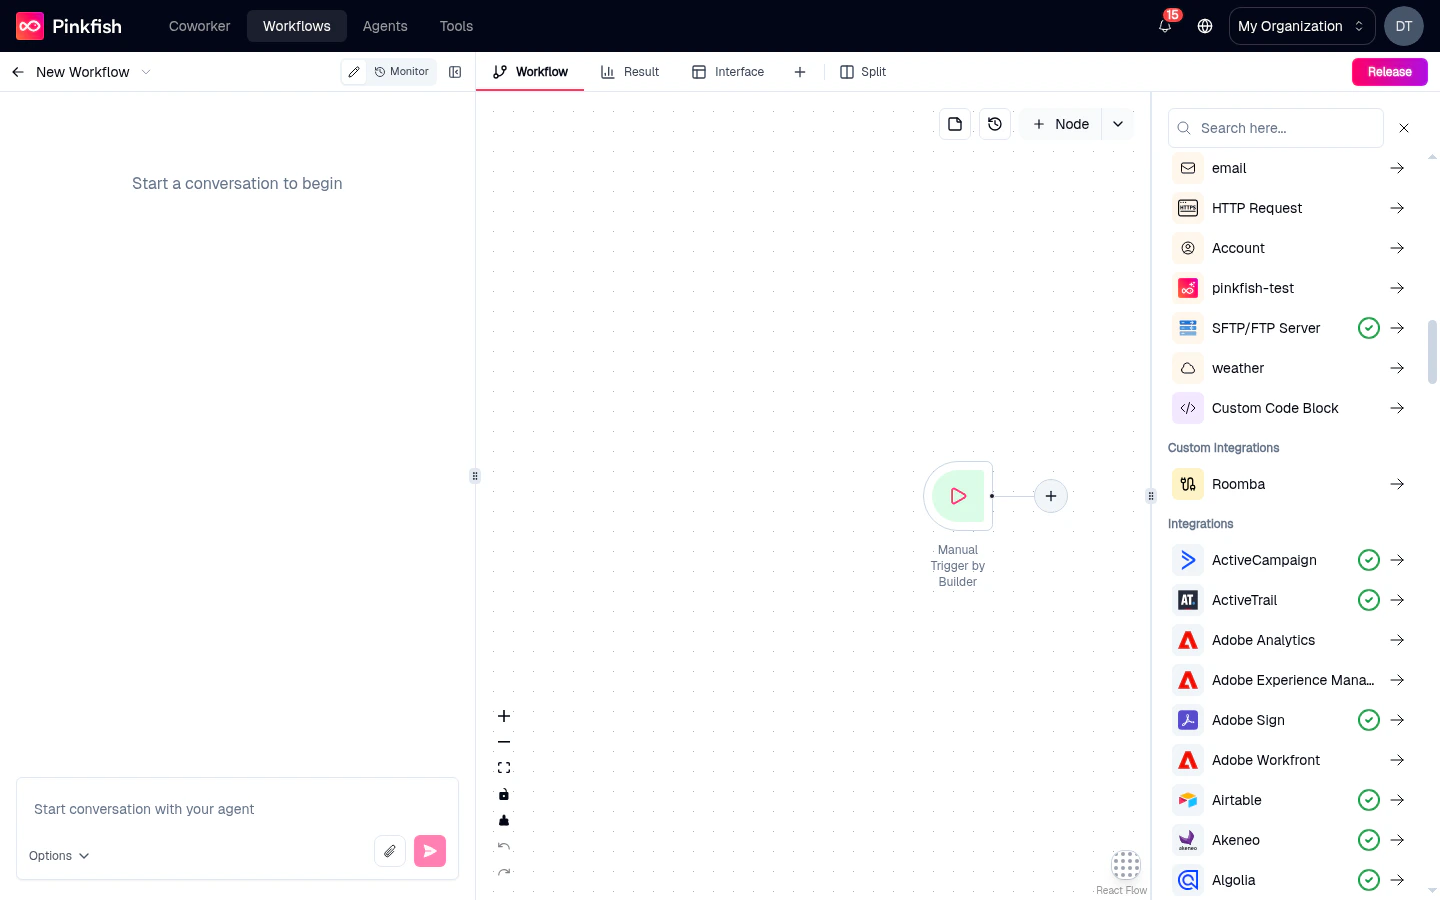
| **Integrations** | First-class third-party apps via MCP servers |
Below the categories are two entry tiles:
* **Setup Triggers** — a shortcut to the Triggers tab.
* **Flow Control** — opens the flow-control picker (If-Else, Router, Merge, For Each, Delay, Loop, While, Parallel, Approval).
And at the very bottom, **Custom Code Block** — "Add custom JavaScript code to your workflow".
## Opening the panel
Click the **Add Node** button in the top-right of the editor header. A side-panel slides in from the right with three tabs: **Nodes**, **Triggers**, and **Interface**.
## The three tabs
Executable nodes — MCP tools, code blocks, agents, sub-workflows, flow-control.
Entry points — manual, API, schedule, email, app triggers, events.
The single user-facing form/results page for your workflow.
### Nodes tab
The **Nodes** tab (titled **Elements** inside the panel — "Elements are the building blocks of your workflow") presents a two-column grid of categories. Click a category to drill into its contents; click the back arrow in the header to pop up.
Top-level categories you'll see:
| Category | What's in it |
| ----------------------- | -------------------------------------------------------------- |
| **Media** | Audio, video, and image-processing MCPs |
| **Document** | PDF, Office, and general document tooling |
| **App Building** | Artifact and web-application tools |
| **Resources** | Vault, Filestore, Knowledge Base, Datastore |
| **Agents & Workflows** | Call another Pinkfish agent or sub-workflow |
| **Browser & Web** | Browser automation, scraping, HTTP utilities |
| **Embedded LLMs** | Direct LLM calls — Anthropic, OpenAI, Gemini, Groq, Perplexity |
| **Bring your own LLM** | Use your own LLM credentials |
| **Database** | Structured and unstructured datastore MCPs |
| **Others** | Email, weather, charting, miscellaneous tooling |
| **Custom Integrations** | Pink-Connect integrations you or your org built |
| **Integrations** | First-class third-party apps via MCP servers |
Below the categories are two entry tiles:
* **Setup Triggers** — a shortcut to the Triggers tab.
* **Flow Control** — opens the flow-control picker (If-Else, Router, Merge, For Each, Delay, Loop, While, Parallel, Approval).
And at the very bottom, **Custom Code Block** — "Add custom JavaScript code to your workflow".
 ### Triggers tab
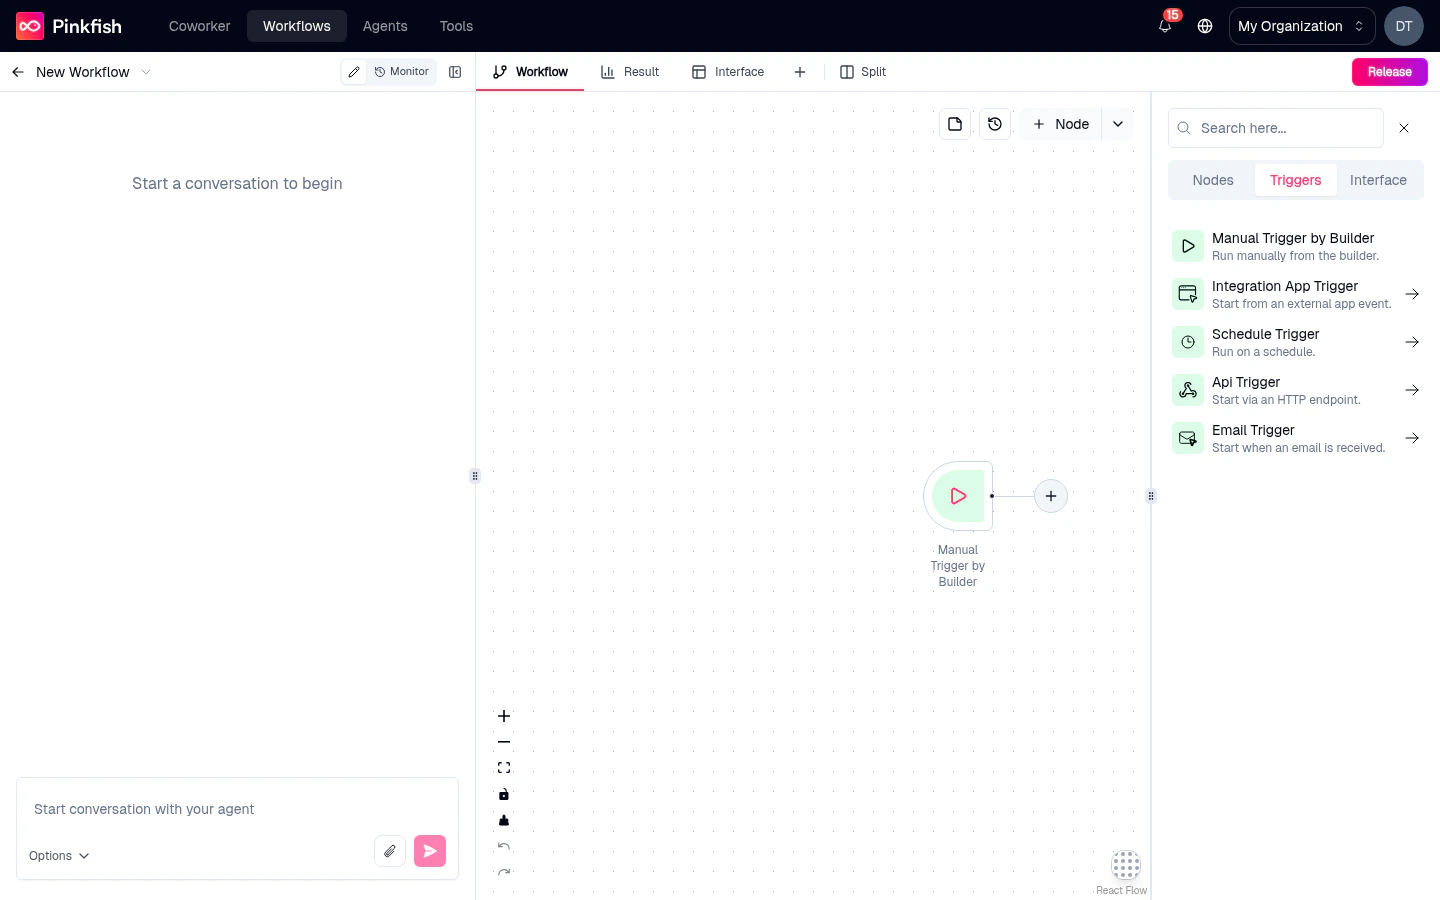
The **Triggers** tab ("Triggers are the events that trigger your workflow") lists every way a workflow can start — Manual, API, Email, Schedule, App triggers, Events. See the [Triggers reference](/agentic-editor/triggers) for a full breakdown of each type.
### Triggers tab
The **Triggers** tab ("Triggers are the events that trigger your workflow") lists every way a workflow can start — Manual, API, Email, Schedule, App triggers, Events. See the [Triggers reference](/agentic-editor/triggers) for a full breakdown of each type.
 ### Interface tab
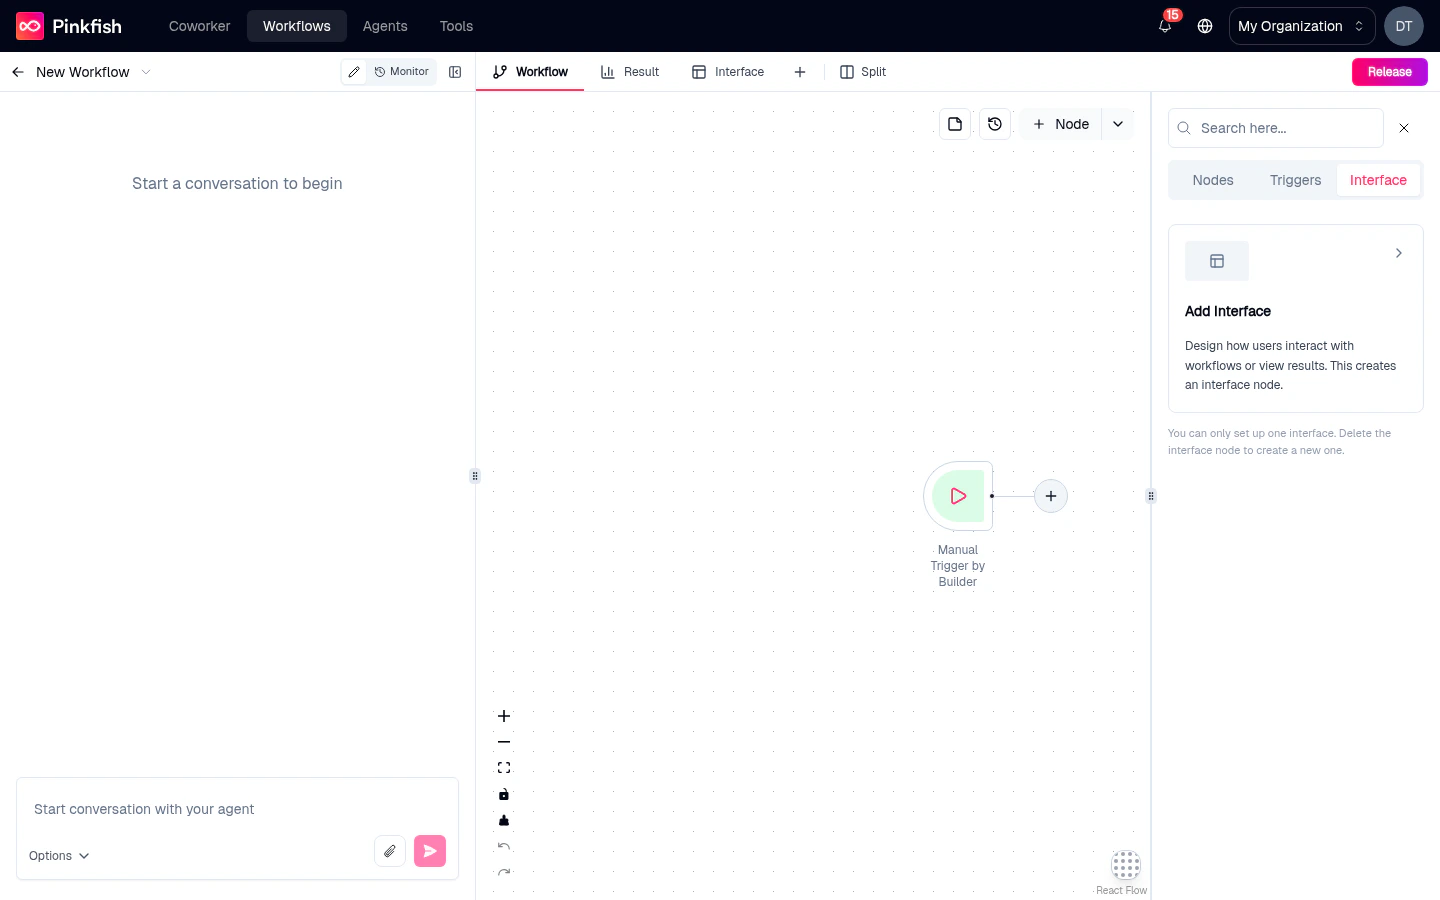
The **Interface** tab ("Configure user-facing interfaces for your workflow") holds a single card: **Add Interface**. Clicking it creates the Interface node and opens the [Interface builder](/agentic-editor/interface) in the right pane.
You can only set up one interface per workflow. Delete the interface node to create a new one.
### Interface tab
The **Interface** tab ("Configure user-facing interfaces for your workflow") holds a single card: **Add Interface**. Clicking it creates the Interface node and opens the [Interface builder](/agentic-editor/interface) in the right pane.
You can only set up one interface per workflow. Delete the interface node to create a new one.
 ## Searching
The search field at the top of the panel filters across all categories and tabs. Type `slack` and you'll see Slack triggers, Slack tools, and Slack-referring skills all collapsed into one list.
## Drilling into a category
Categories nest a few levels deep:
1. **Click a category** — e.g. **Integrations**.
2. **Pick an app** — e.g. **Salesforce**.
3. **Pick an action** — e.g. **Create Lead** or **Search Contacts**.
The header at the top of the side-panel tracks your location with the app logo and a **← back** arrow, so you never lose your place. The close (✕) button always returns you to the editor regardless of how deep you've drilled.
## Placing the node
When you select a leaf entry (an app action, flow-control node, or code block), the panel closes and the node is dropped onto the canvas — typically to the right of your most recently selected node. Drag it wherever you want; connect its input handle to an existing node's output to wire it in.
For flow-control nodes, the agent often adds them with sensible defaults — an If-Else comes pre-wired to the currently selected node. You can always adjust the wiring by dragging the edges.
## What's next
Deep dive on every node type and its settings.
Start your workflow with a trigger.
Build user-facing forms and result pages.
Arrange and connect the nodes you've added.
## Searching
The search field at the top of the panel filters across all categories and tabs. Type `slack` and you'll see Slack triggers, Slack tools, and Slack-referring skills all collapsed into one list.
## Drilling into a category
Categories nest a few levels deep:
1. **Click a category** — e.g. **Integrations**.
2. **Pick an app** — e.g. **Salesforce**.
3. **Pick an action** — e.g. **Create Lead** or **Search Contacts**.
The header at the top of the side-panel tracks your location with the app logo and a **← back** arrow, so you never lose your place. The close (✕) button always returns you to the editor regardless of how deep you've drilled.
## Placing the node
When you select a leaf entry (an app action, flow-control node, or code block), the panel closes and the node is dropped onto the canvas — typically to the right of your most recently selected node. Drag it wherever you want; connect its input handle to an existing node's output to wire it in.
For flow-control nodes, the agent often adds them with sensible defaults — an If-Else comes pre-wired to the currently selected node. You can always adjust the wiring by dragging the edges.
## What's next
Deep dive on every node type and its settings.
Start your workflow with a trigger.
Build user-facing forms and result pages.
Arrange and connect the nodes you've added.